Want your students to participate in a chess lesson actively?
Then Lichess interactive lesson mode is something you must be looking for! It’s a unique way to create chess lessons online.
With this feature, you can create puzzles, openings, endgame tactics, and more. And the best part is it’s free to use.
So let’s get started and see how you can create Lichess interactive lessons!
What is an Interactive Lesson?
Interactive Lesson is a type of analysis mode in Lichess Study that lets you create action-based chess lessons using hints, directives, and feedback.
This feature is useful for creating puzzles, studying openings, exploring variations, and analyzing games.
It’s an engaging way to learn chess and is particularly useful for teaching students.
How to create Lichess Interactive Lesson
To learn how to create Lichess interactive lessons, you’ll first need to create a Lichess study.
Firs, head over to “Learn” > “Study.” Then click the green color plus icon on the top right.
To create a study, you’ll be asked whether you want to limit certain features such as “Cloning,” “Visibility,” and “Chat.”
Make sure you select “No: let people browse freely” in “Enable sync” as you want players to go through the study at their own pace. You can go with “Yes: keep everyone on the same position” if you’re teaching a live lesson.
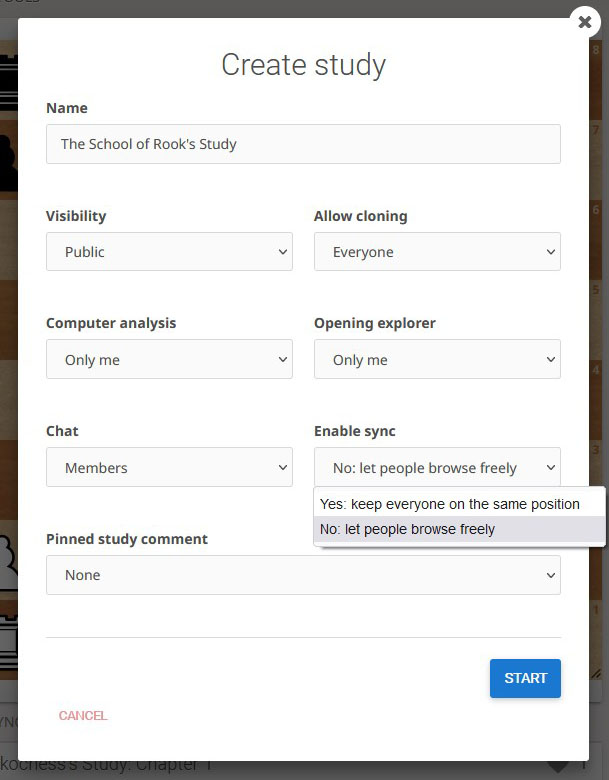
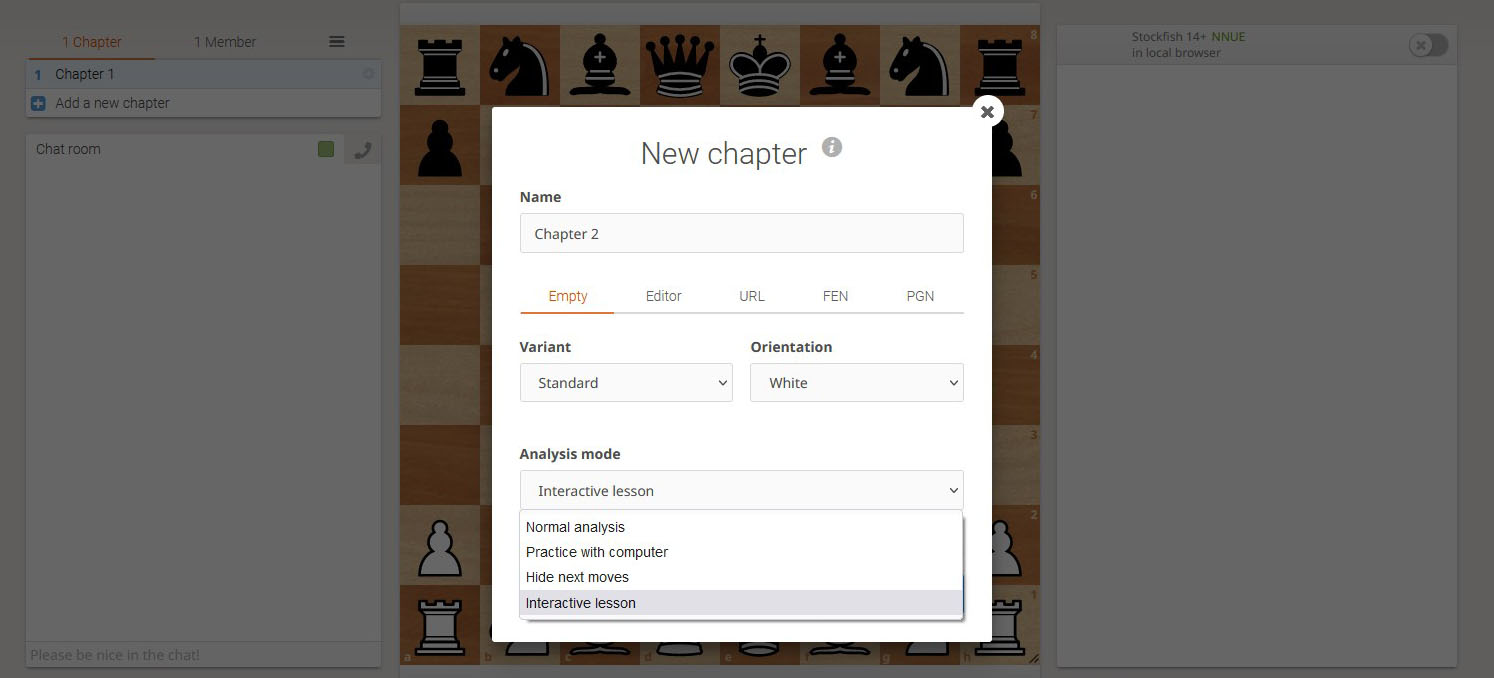
Also, restrict “Computer Analysis” and “Opening Explorer” to yourself, i.e., “Only me.” Then select “Create study,” go to “Chapters” on the top left side and click “Add a new chapter.”

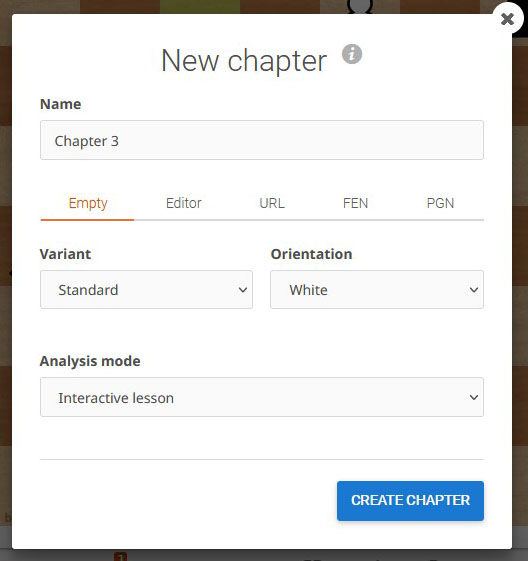
Over here, select “Interactive lesson” in the “Analysis mode.”
How to create puzzles with Lichess Interactive Lesson
To create puzzles with Lichess Interactive Lesson, add the position and answer to the puzzle, and give hints and feedback for every move.
Here, we’re using a puzzle from FM Thijs Laarhoven’s Lichess Study as an example.
Step 1: Enter theoPosition
You can add a position to the chapter in two ways:
- Manual method
- Import method
1. Manual method
Select the Editor tab and manually arrange the pieces. Next, select whose turn it is to play.
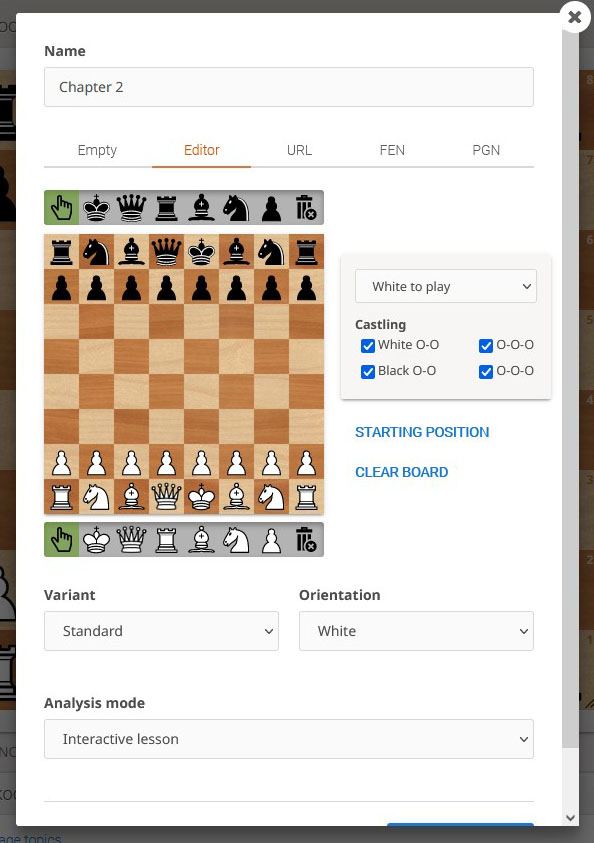
Then select if White and Black can castle kingside and queenside in the puzzle. Keep the variant “standard” and “Interactive lesson” as your analysis mode.
The orientation of the pieces is the color of the player’s pieces.
2. Import method
Select the FEN tab. Copy the FEN of the position from the source and paste it in the box below.
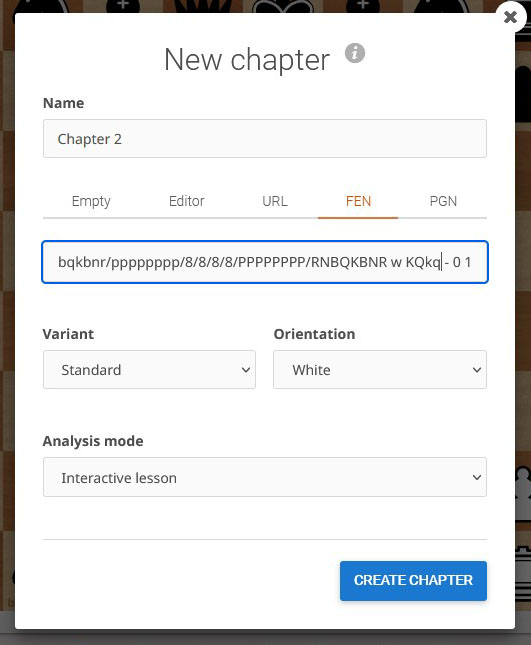
Next, choose the “standard” variant, “white” orientation, and “Interactive lesson” analysis mode. The puzzle will automatically load in the chapter.
Step 2: Enter the answer to the puzzle
Once you create a chapter, add the solution to the puzzle by moving the pieces on the board.
We can then proceed to add hints, directives, annotations, and glyphs.
Step 3: Help the player find the first move
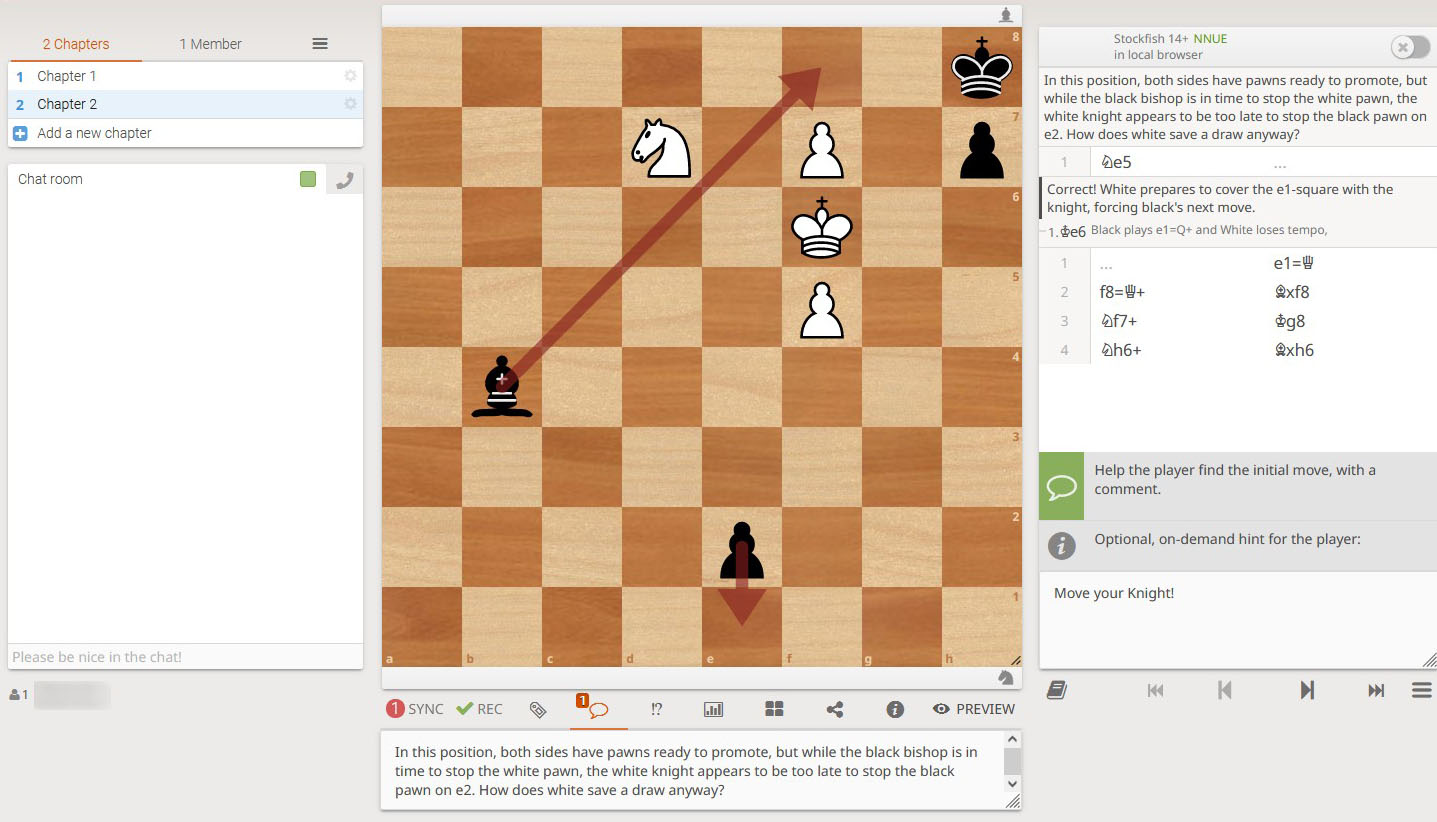
Click the chat icon below the chessboard to add an introduction of the position, followed by a hint.
Let’s have a look at the following example.
Here, White and Black have pawns ready to promote. But the Black bishop can stop the pawn promotion at f8.
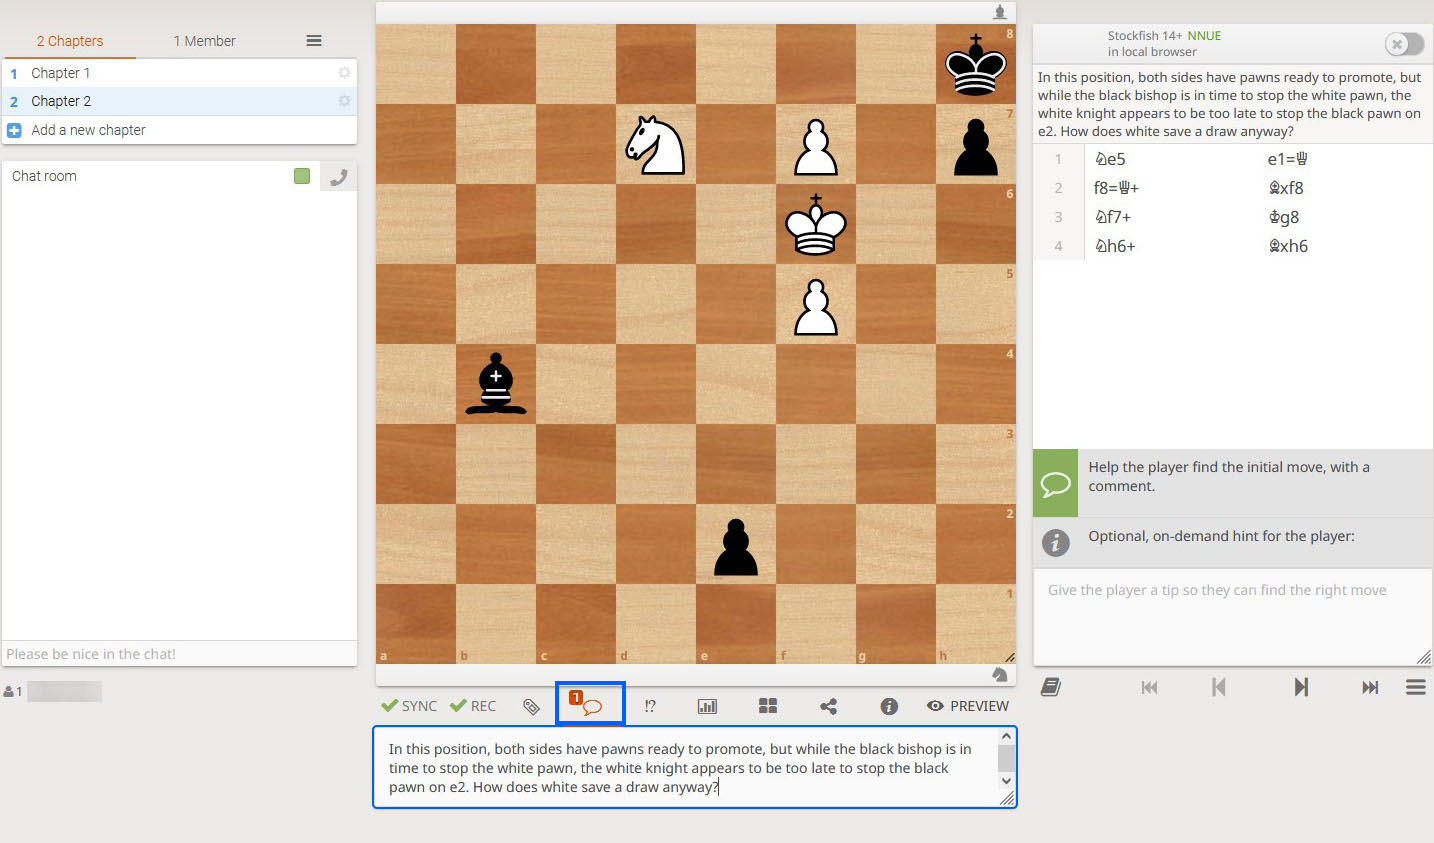
On the other hand, White can’t stop the e2 pawn from promotion. So White’s best bet is to go for a draw. So what should White play to go for a draw?
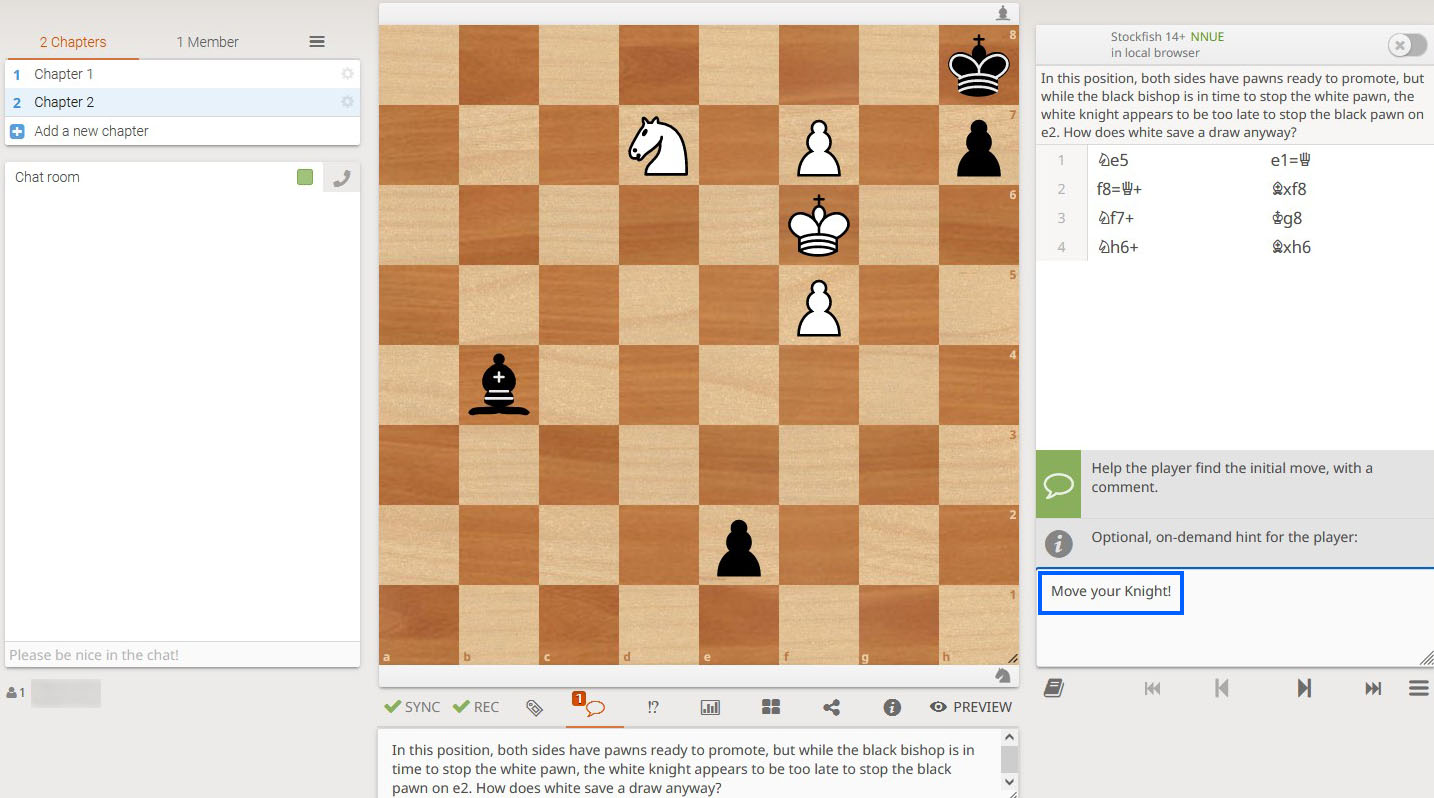
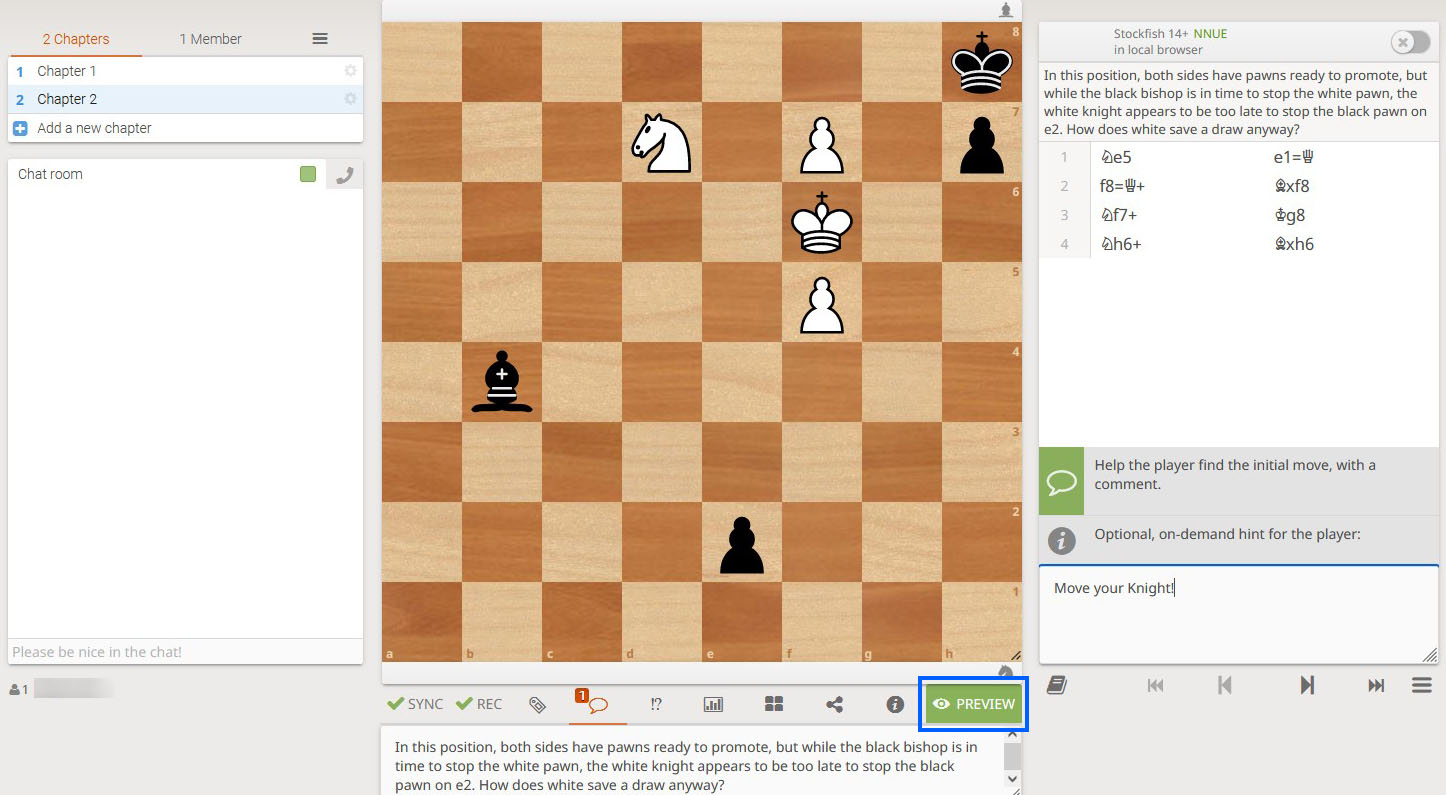
Step 4: Add a tip
Suppose the player still can’t find a move and needs more help, then you can give a tip.
On the bottom right side, there’s a box that says, “Give a tip so they can find the right move.” Enter the tip there. We’ve added “Move your knight!” as the hint in our example.
Make sure no move has been played on the board yet. Now, click the eye icon of “Preview” located below the chessboard.
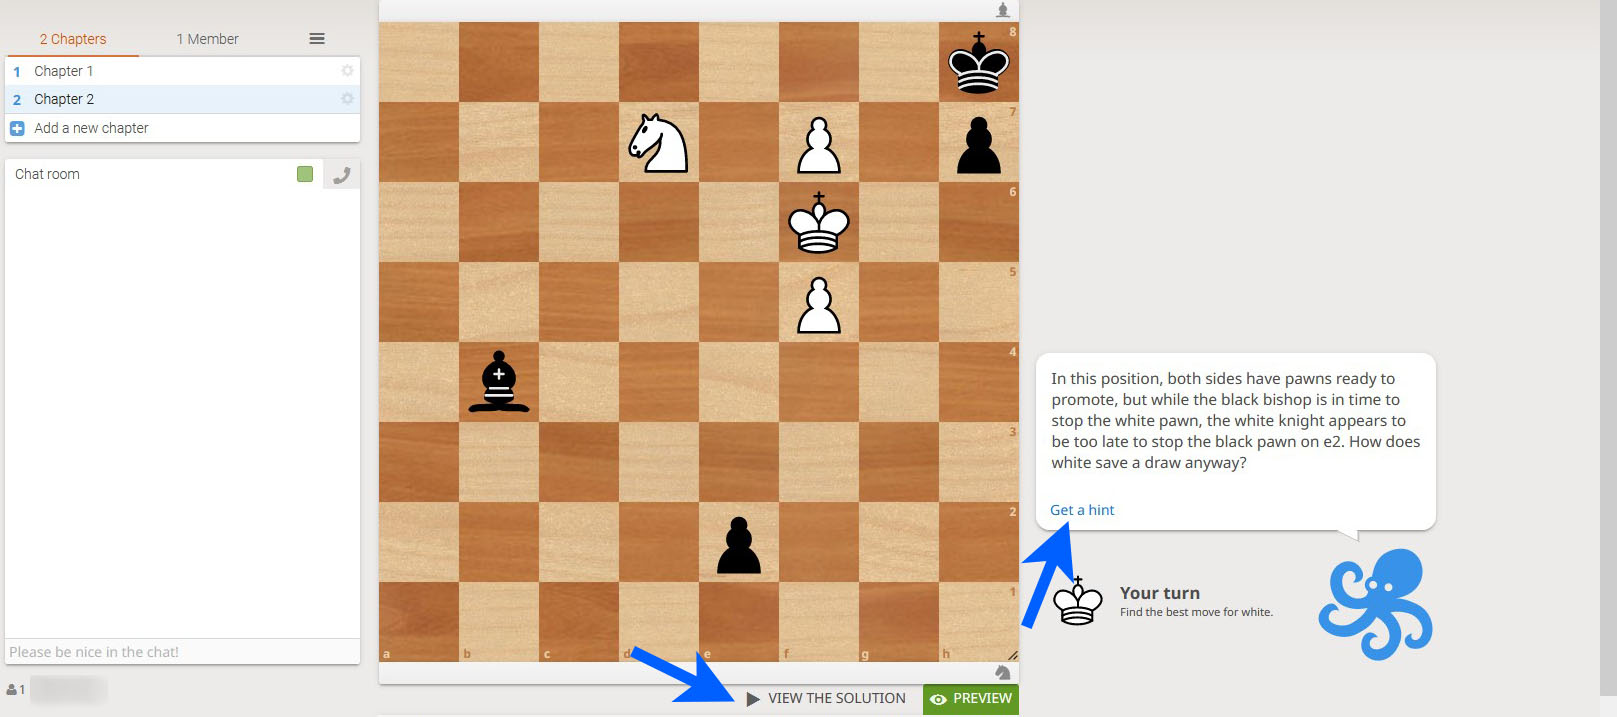
You’ll see the introduction on the right side. The spectator can click “Get a hint” for more help.
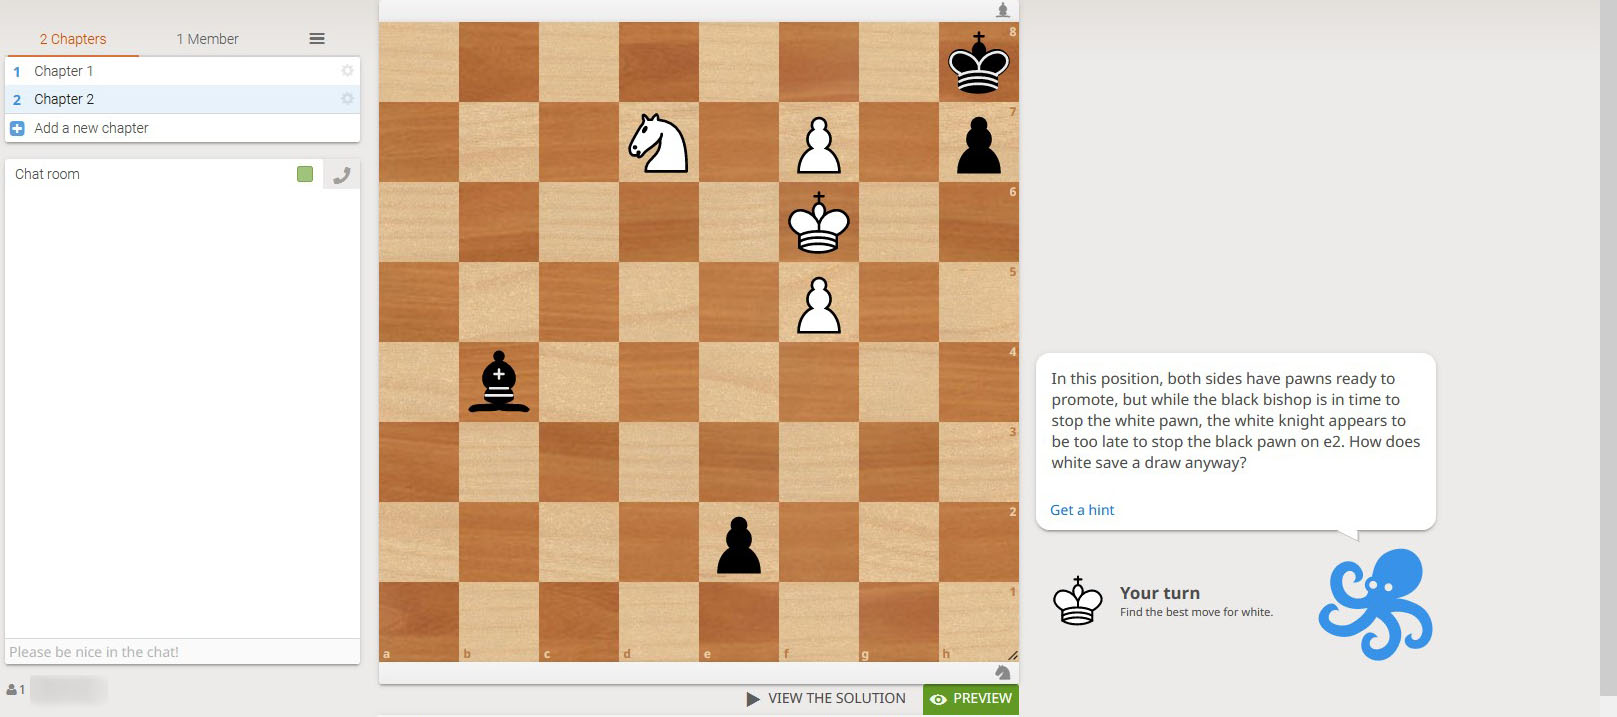
If that fails, they can click “View the solution” below the chessboard.
Step 5: Comment on the answer
Click “Preview” again to return to the editing mode. Now, click the first move and go to the chatbox again to comment on the player’s correct move.
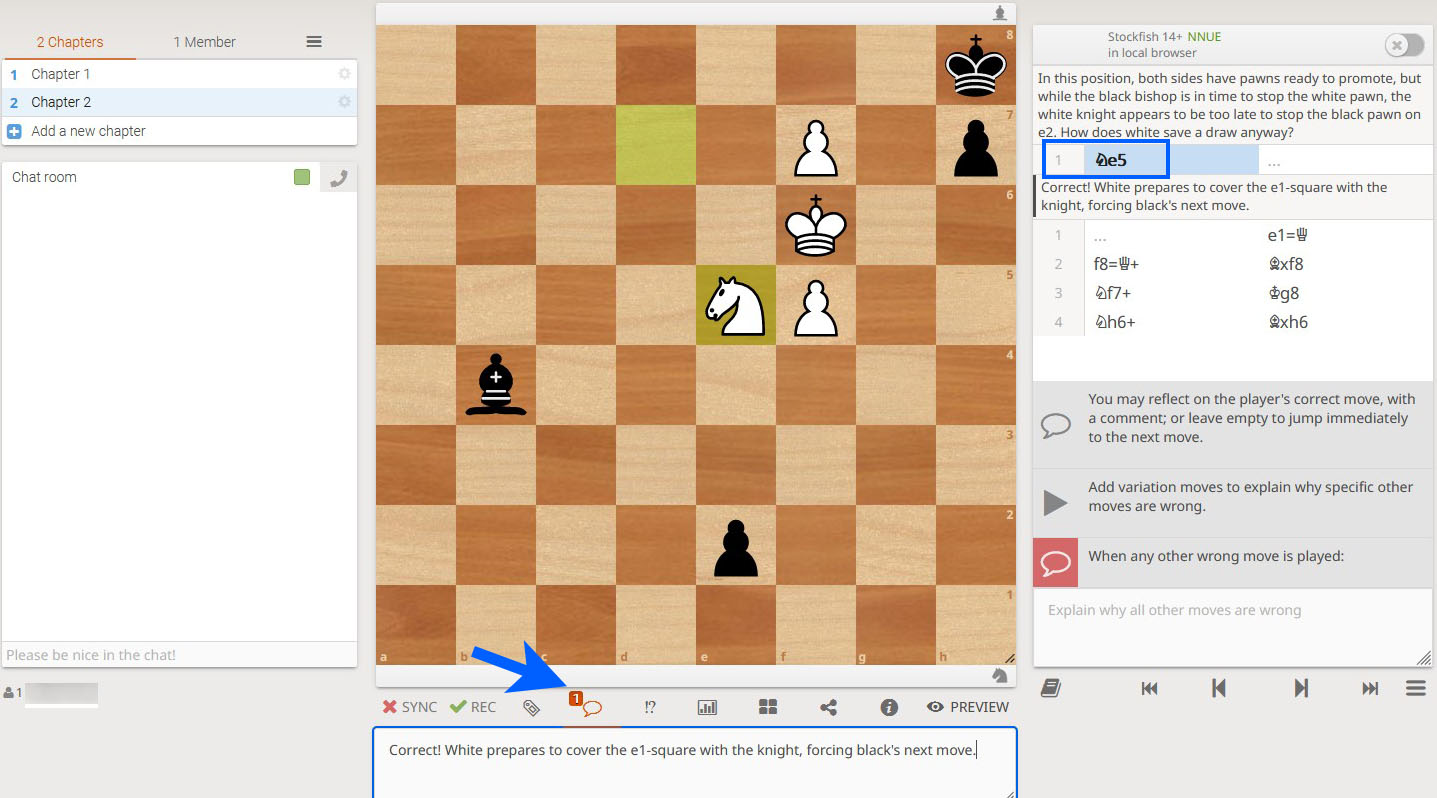
In the example, we’ll first congratulate the player for getting the first move right and then give its reasoning.
Step 6: Give feedback on the wrong moves
You have two options here:
- Comment on why all other moves are wrong
- Comment on the wrong moves individually
1. Comment on why all other moves are wrong
There will be only one comment feedback for all the wrong moves. It makes sense to go with this option when there isn’t much to say for each move separately.
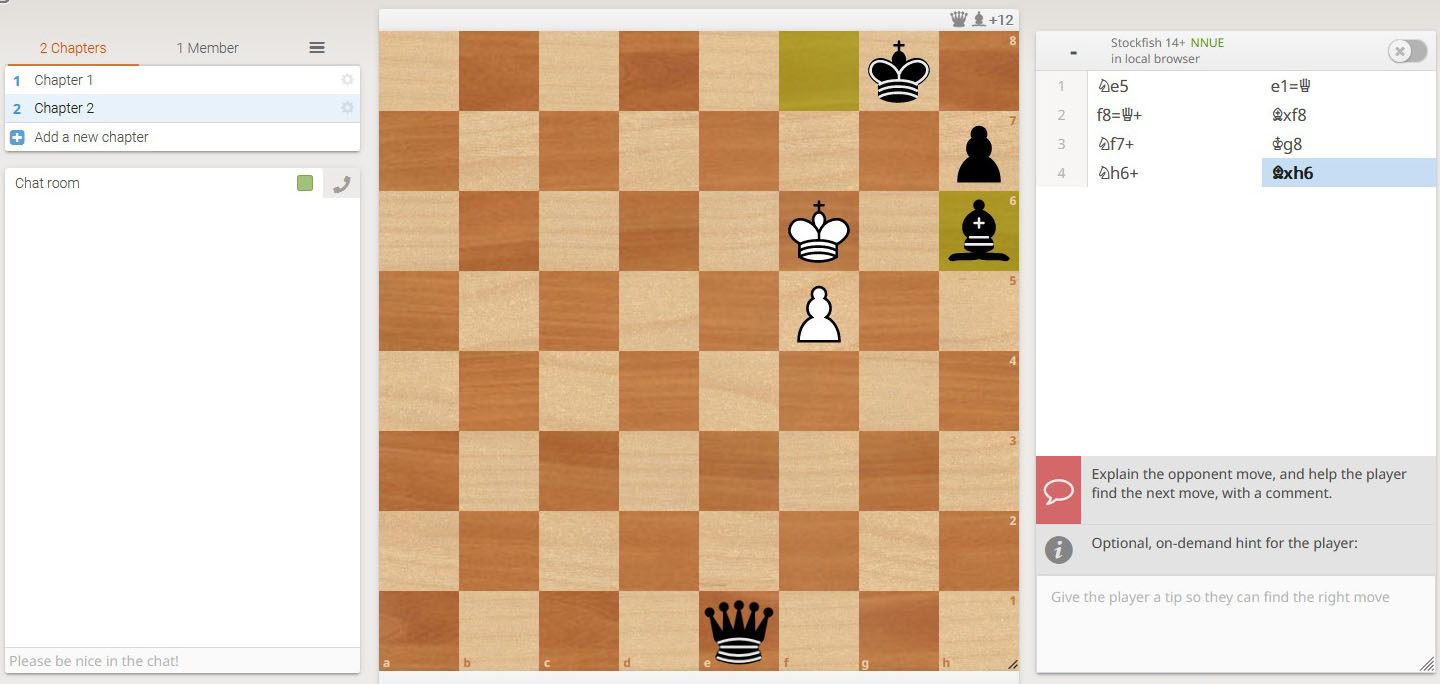
This comment is after the first move has been played. In our example, you’re on the Ne5 move.
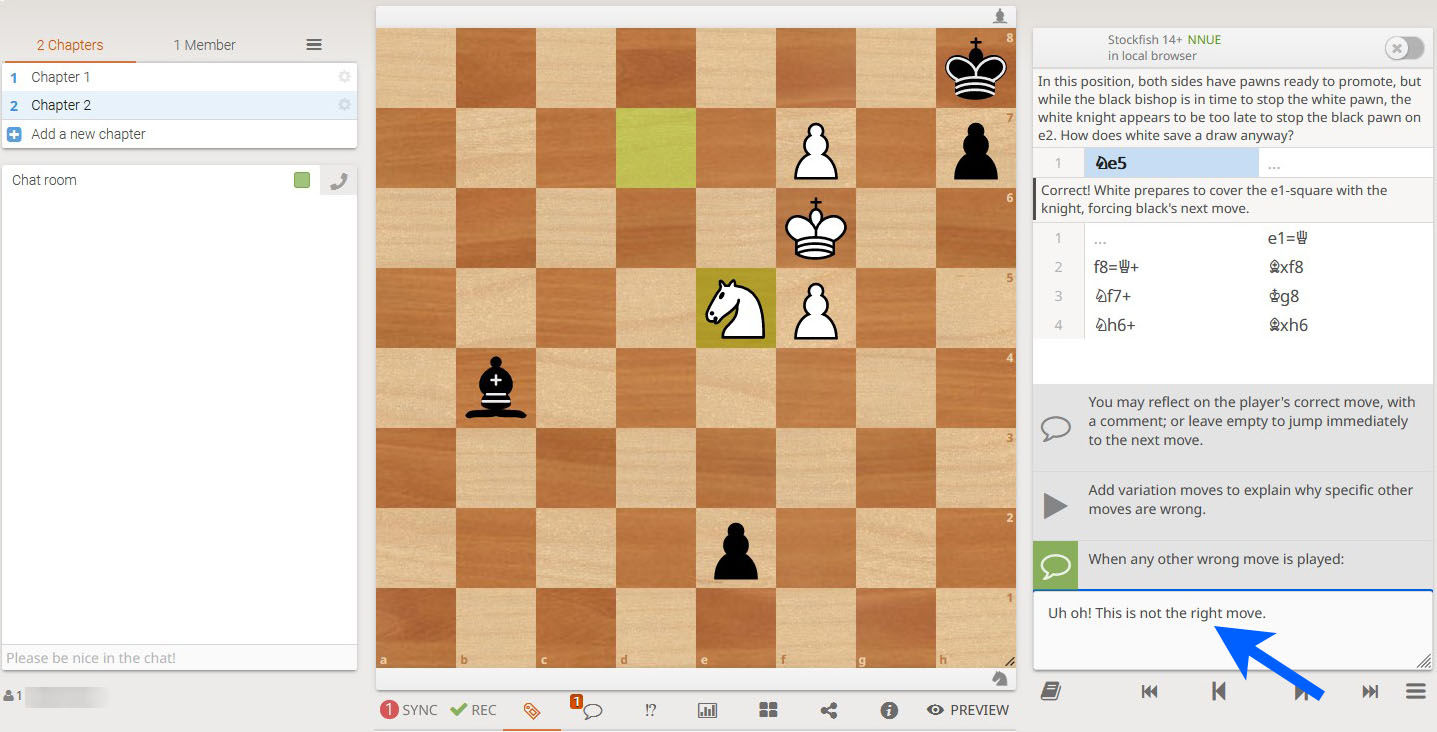
Go to the bottom right side and comment below the red color chat icon.
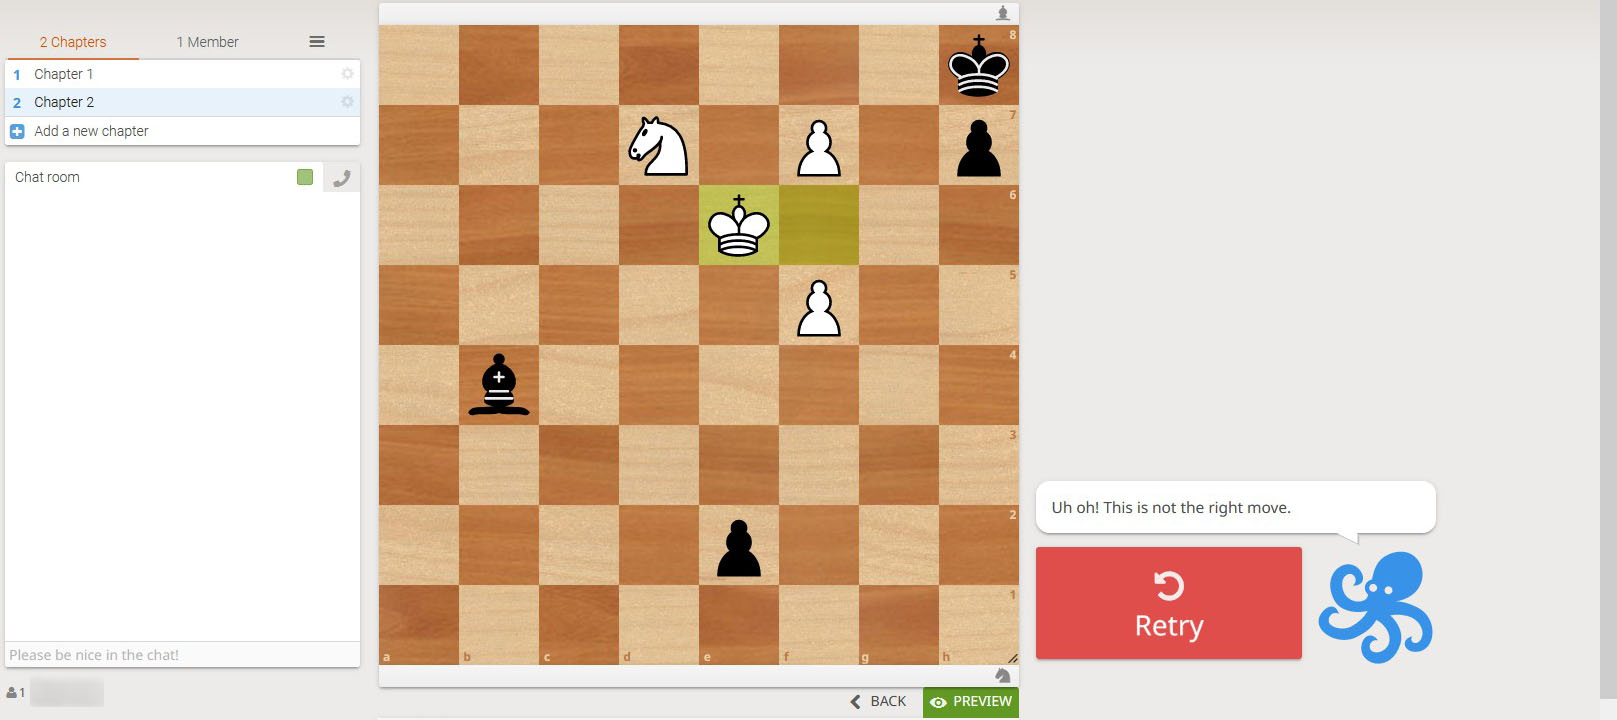
If the player plays a wrong move, this message will pop up. They can click on Retry to give the puzzle another shot.
You can verify if your comment shows up correctly by previewing the puzzle.
2. Comment on the wrong moves individually
Here, you’ll give feedback on all the wrong moves individually. This way, you can explain the reasoning behind each bad move.
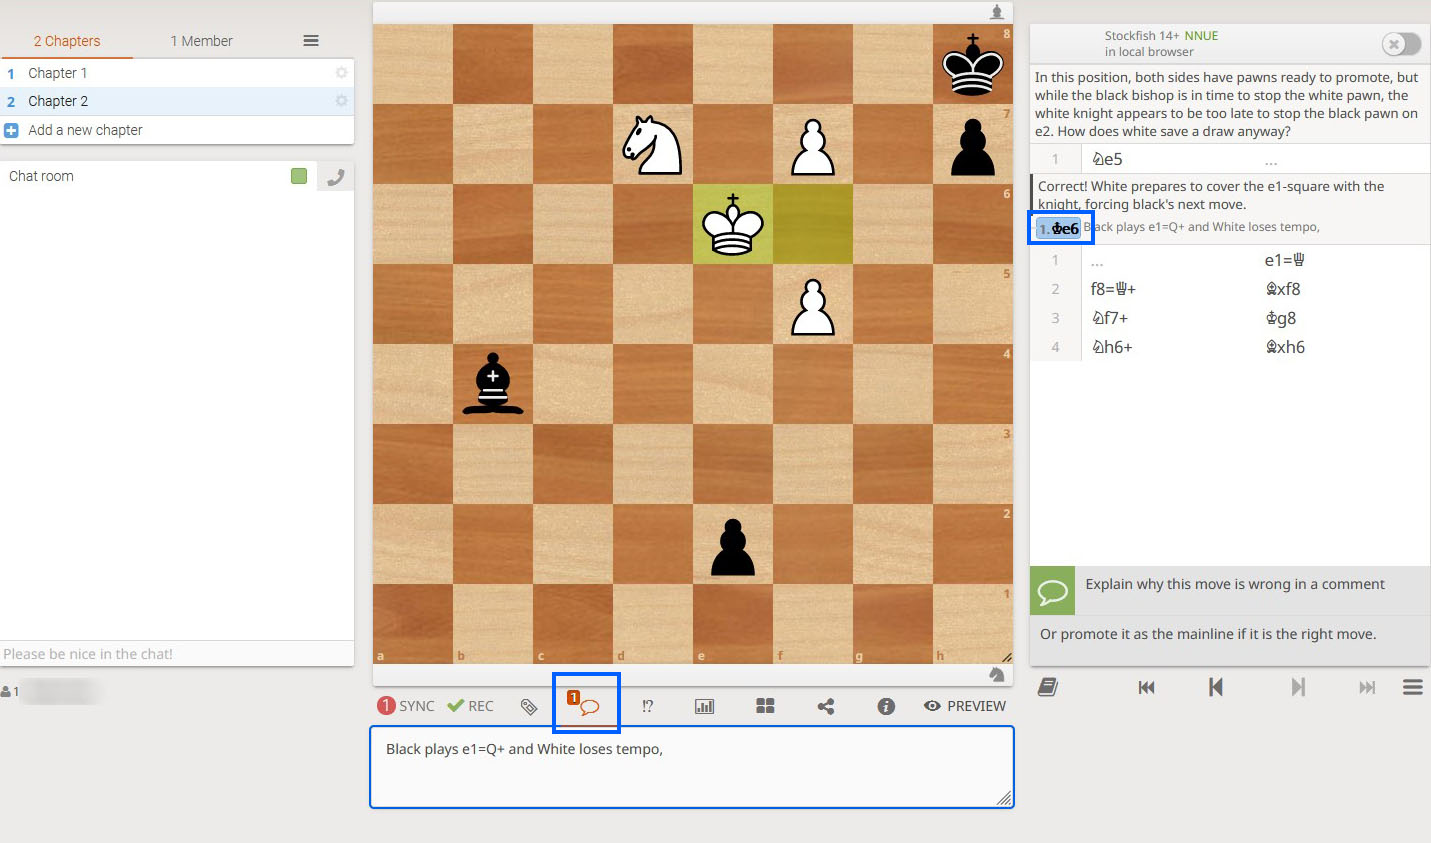
Execute the left arrow key to go back to the original position. Enter a variation, i.e., the wrong move.
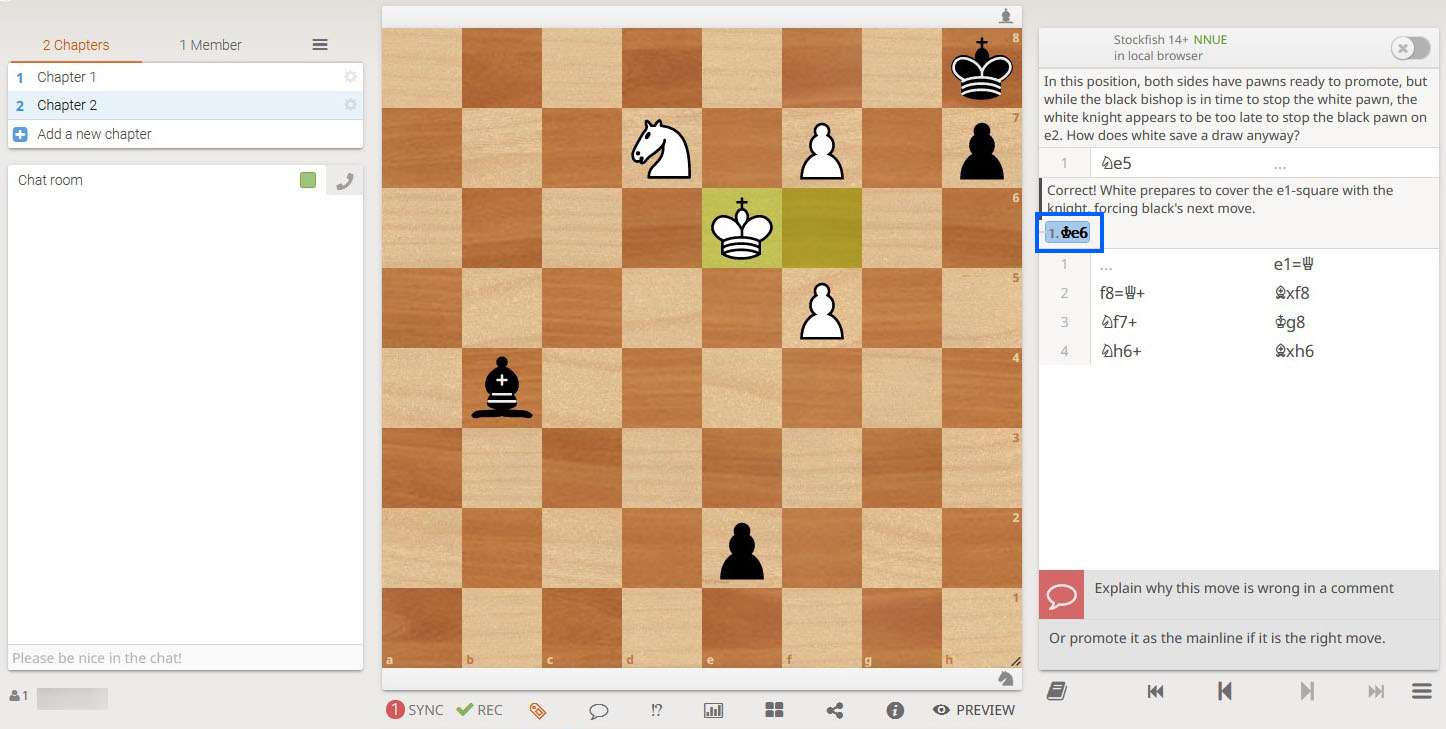
Then go to the chatbox below the board and enter your comment there. You can rerun these steps for all the variations.
Note:
- You can critique specific wrong moves and make a generalized comment for all the other wrong moves simultaneously.
To do so, comment on all the wrong moves in the chatbox first. This chatbox is on the bottom right side of your screen.
Then, you can specifically add feedback for those wrong moves by following the steps in this section.
- You can click on the move notation to delete a variation or promote it to the mainline.
Step 7: Add arrows and circles
Add tips and comment on the remaining moves. Then you can go back to each move and add circles and arrows.
Illustrating with arrows and circles eliminates the guesswork. The player can also see your analysis more clearly. You can use it to show right or wrong moves and variations.
There are four colors available to illustrate a position: green, red, blue, and orange.
| Color | Circle | Arrow |
| Green | Right-click | Right-click and then drag to the square |
| Red | Shift key + Right-click | Hold the Shift key first, then right-click and drag to the square. |
| Orange | Shift key + Alt key + Right-click | Hold the Shift key first, then the Alt key, followed by a right-click and drag to the square. |
| Blue | Alt key + Right-click | Hold the Alt key first, then right-click and drag to the square. |
To remove a circle or arrow, follow the same respective steps. For example, if you want to remove a Red arrow, then go to the origin square > press the shift key > right-click > drag the cursor to the destination square.
Step 8: Add glyphs
You can annotate with glyphs to assess a move.
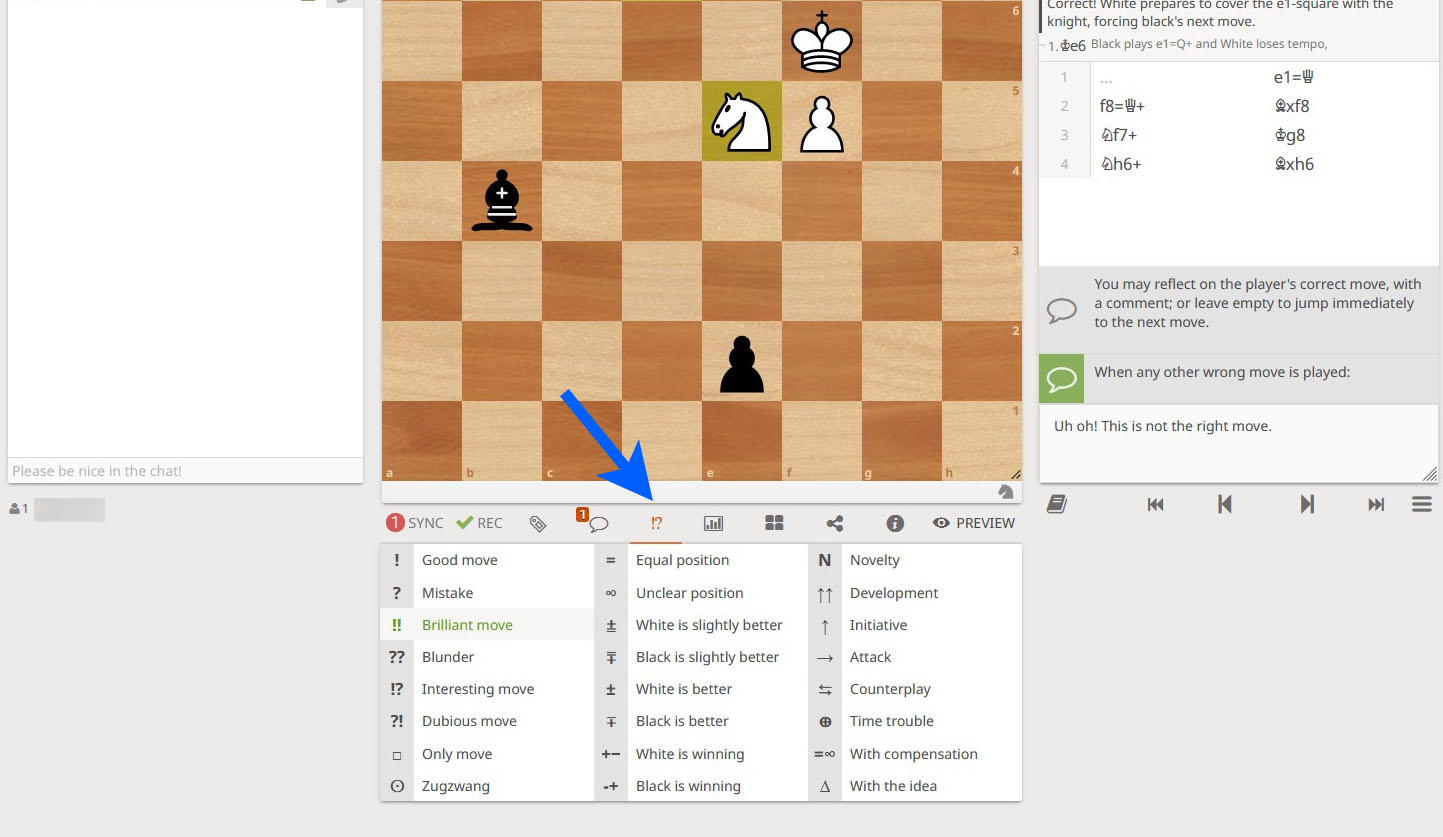
Click the move first and then go to the exclamation point and question mark icon below the chessboard. You have 24 symbols to choose from.
That’s it! You’ve successfully created a puzzle with Lichess interactive lesson.
How to create an opening repertoire with Lichess Interactive Lesson
We’ll create an opening repertoire of Giuoco Piano, also known as Italian Game, with Lichess interactive lesson below:
Step 1: Enter the mainline
Your first step will be to enter the mainline of the opening. You can do it in two ways:
- Manual method
- Import method
Manual Method
Select the “Empty” tab. Keep the variant “standard” and orientation “White.” Finally, choose “Interactive lesson” as your analysis mode.
You can then manually move the pieces as per the mainline.
Import method
Select the “PGN” tab. Copy the PGN of the mainline from the source and paste it in the box below.
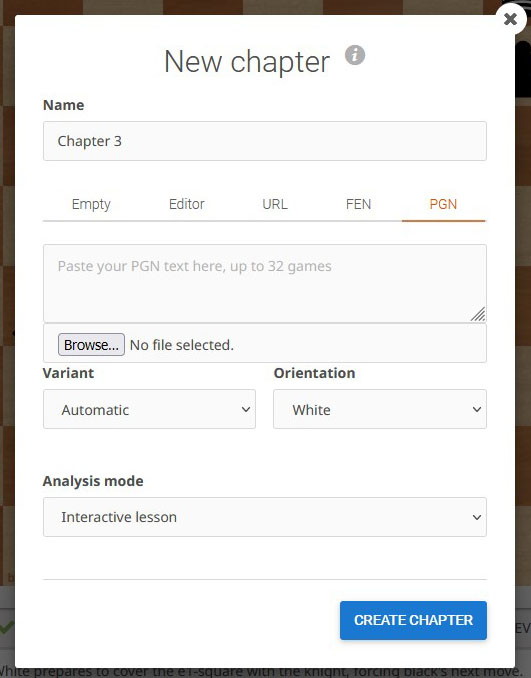
Next, choose the “Standard” variant, “White” orientation, and “Interactive lesson” analysis mode. The mainline will automatically load in the chapter.
Now it’s time to add hints, directives, annotations, and glyphs.
Note:
If you want the spectator or player to be Black, click the cogwheel icon beside the chapter name to change the orientation. And then select Black from the “Orientation” dropdown.
Step 2: Introduce the opening
Add an introduction to familiarize the opening to your audience. To do so, click the chat icon and type your message here.
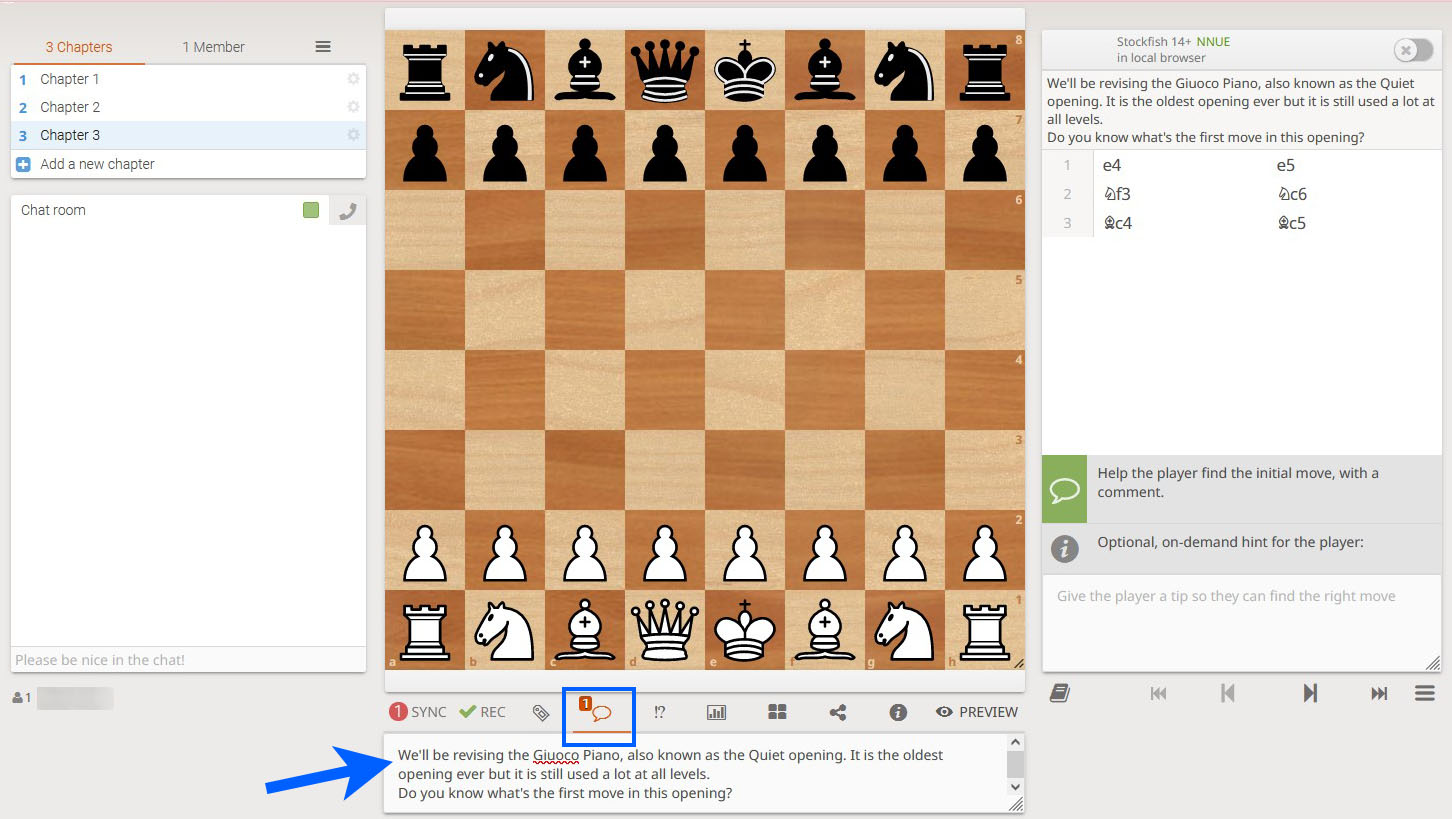
Then add your first question below the introduction. In our example, spectators are simply asked if they know the first move.
Make sure no move has been played on the board. This message will show up before you begin with the Lichess interactive lesson.
Step 3: Add a hint
What if the player doesn’t know the first move to the opening? That’s where a tip helps them play the first move.
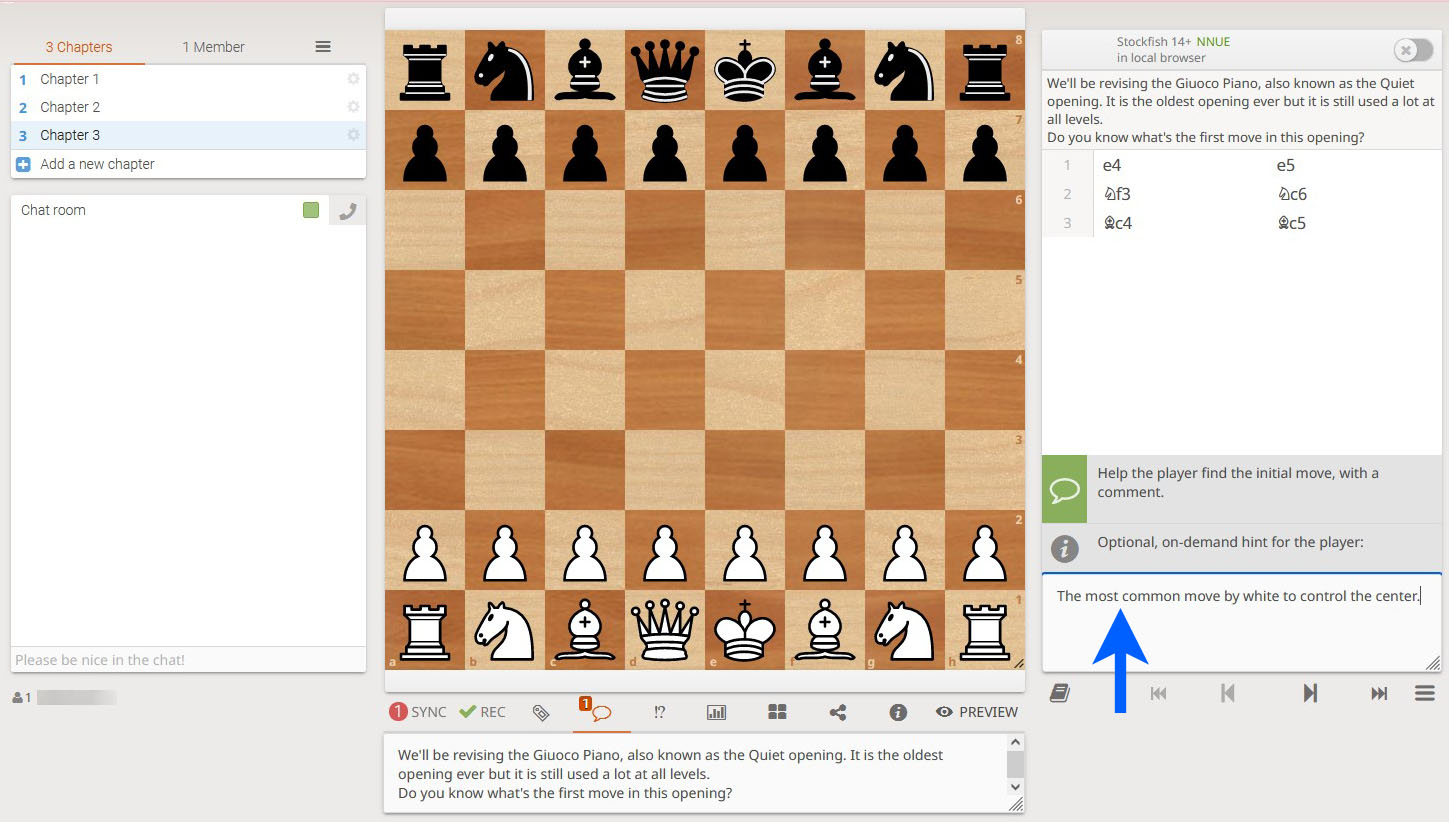
On the bottom right, add a hint to help the player find the right move. In the example, I’ve added the direction “The most common move by White to control the center.”
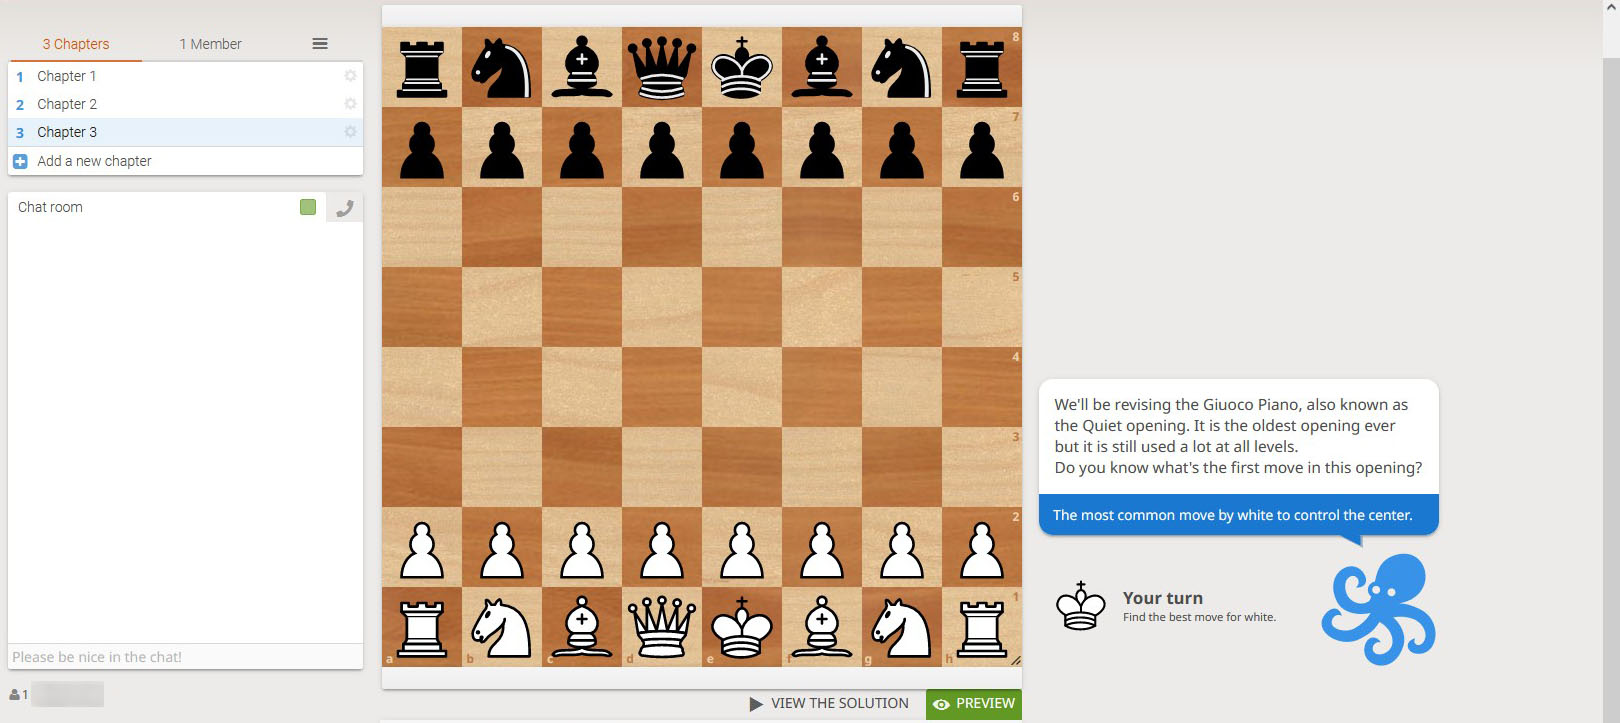
The player can ask for a clue by hitting the “Get a hint” button.
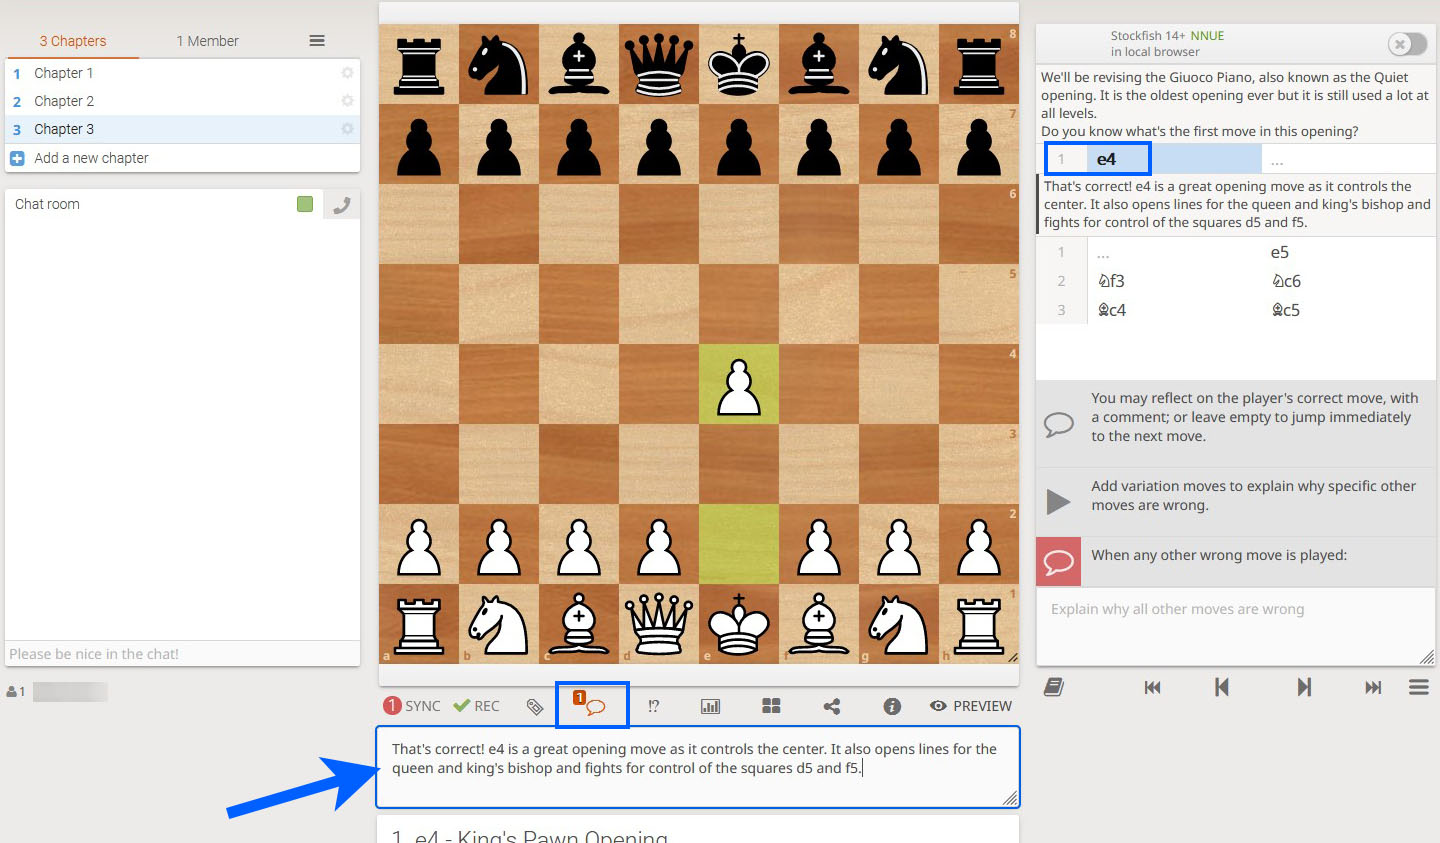
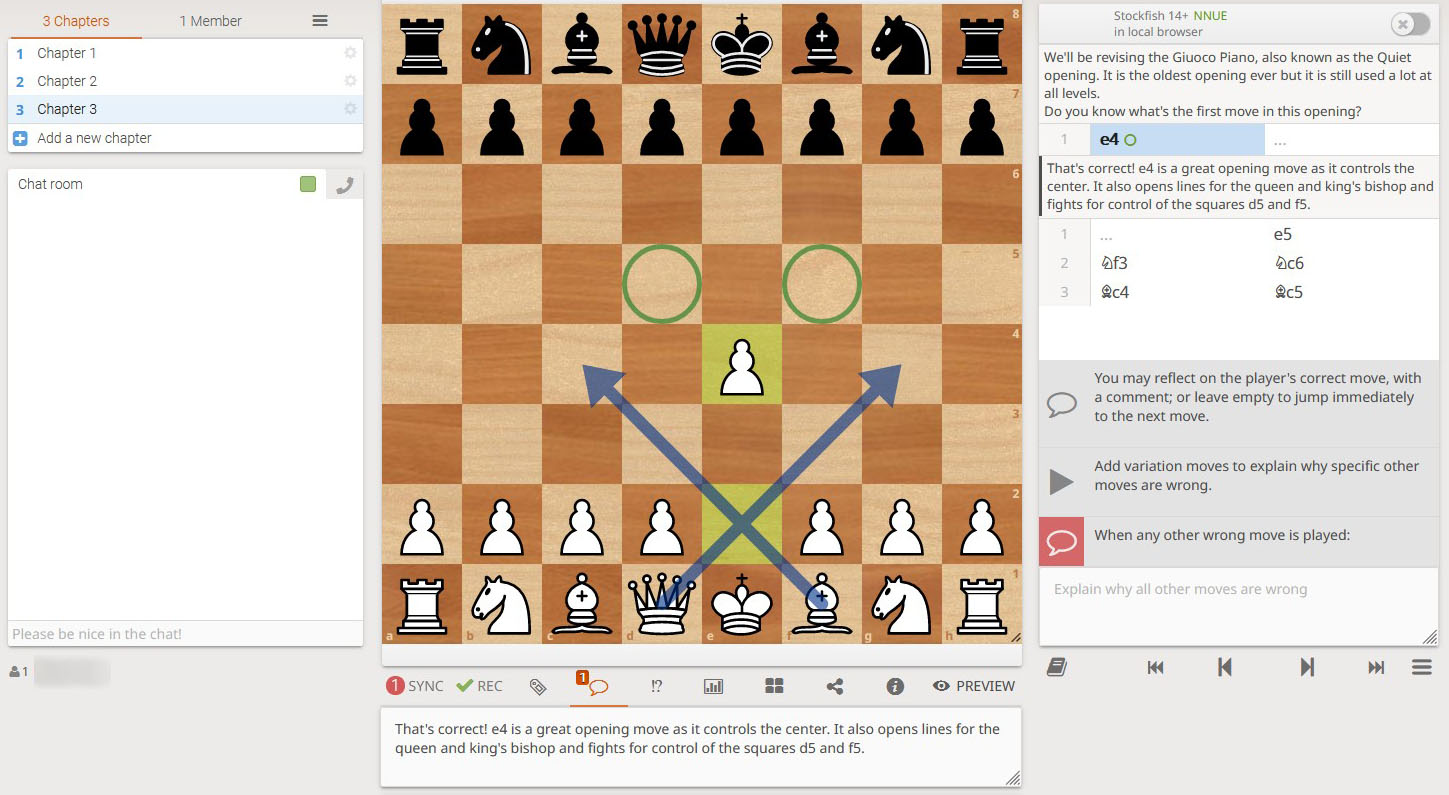
Step 4: Comment on the right move
This message will appear once the player gets the right answer. To comment on the right move, click on the move first.
Then, go to the chatbox tab below the chessboard to add a comment.
Step 5: Add arrows and circles
Now, how do you demonstrate control over d5 and f5 squares? This is where arrows and circles help you out.
They avoid confusion and drive your point across. Players can also visualize what you’re saying clearly.
Lichess interactive lesson has four color options: green, blue, red, and orange.
| Color | Circle | Arrow |
| Green | Right-click | Right-click and then drag to the square |
| Orange | Shift key + Alt key + Right-click | Hold the Shift key first, then the Alt key, followed by a right-click and drag to the square. |
| Red | Shift key + Right-click | Hold the Shift key first,then right-click and drag to the square. |
| Blue | Alt key + Right-click | Hold the Alt key first, then right-click and drag to the square. |
If you want to erase a circle or arrow, follow the same steps taken to create them.
For example, if you want to erase a Blue arrow, then go to the origin square > press the alt key > press the shift key > right-click > drag the cursor to the destination square.
Select “Preview” below the board to check if the sequence of the move and comments is correct.
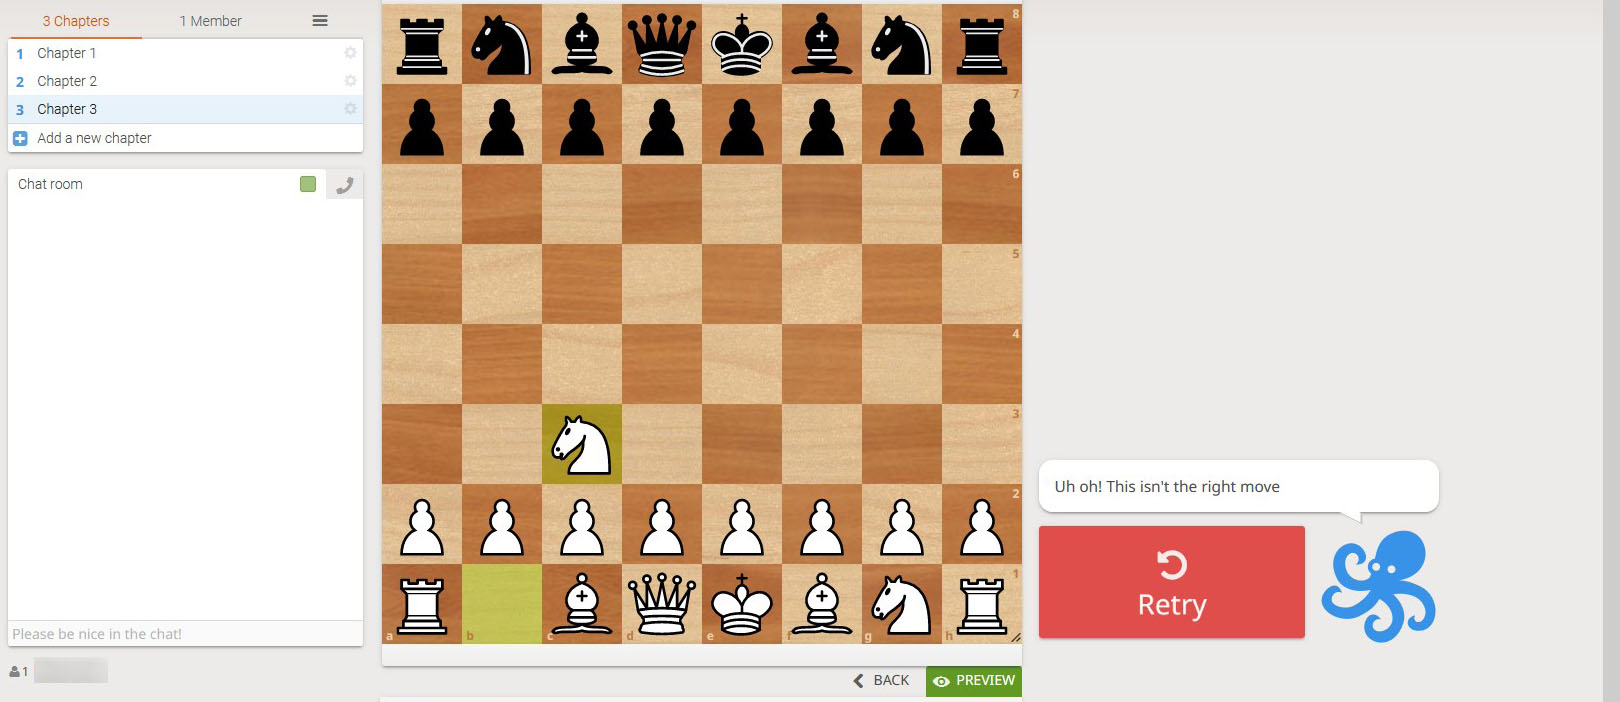
Step 6: Comment on the wrong move
Go back to the editing mode by clicking on the “Preview” again. To give feedback on the incorrect moves, you can share one general message across all the wrong moves, like “Uh oh! This is a wrong move.”
You can also choose to comment on the incorrect moves individually. Let’s check out how to give a remark for both below:
General message
Ensure you have played the move you want to comment on. In our example, we’ll be commenting after e4 has been played.
Click the red chat icon on the bottom right side. Type the remark below the icon.

The players will see this message when they play any move besides the right move. They’ll have an option to “Retry.”
Specific message
Here, we’ll create variations, i.e., alternate moves on the board.
Let’s go back to your example. Here, we want to comment on wrong moves like Nf3 or d4.
So we’ll go to the start of the chapter as this is the first move. No move has been played on the board.
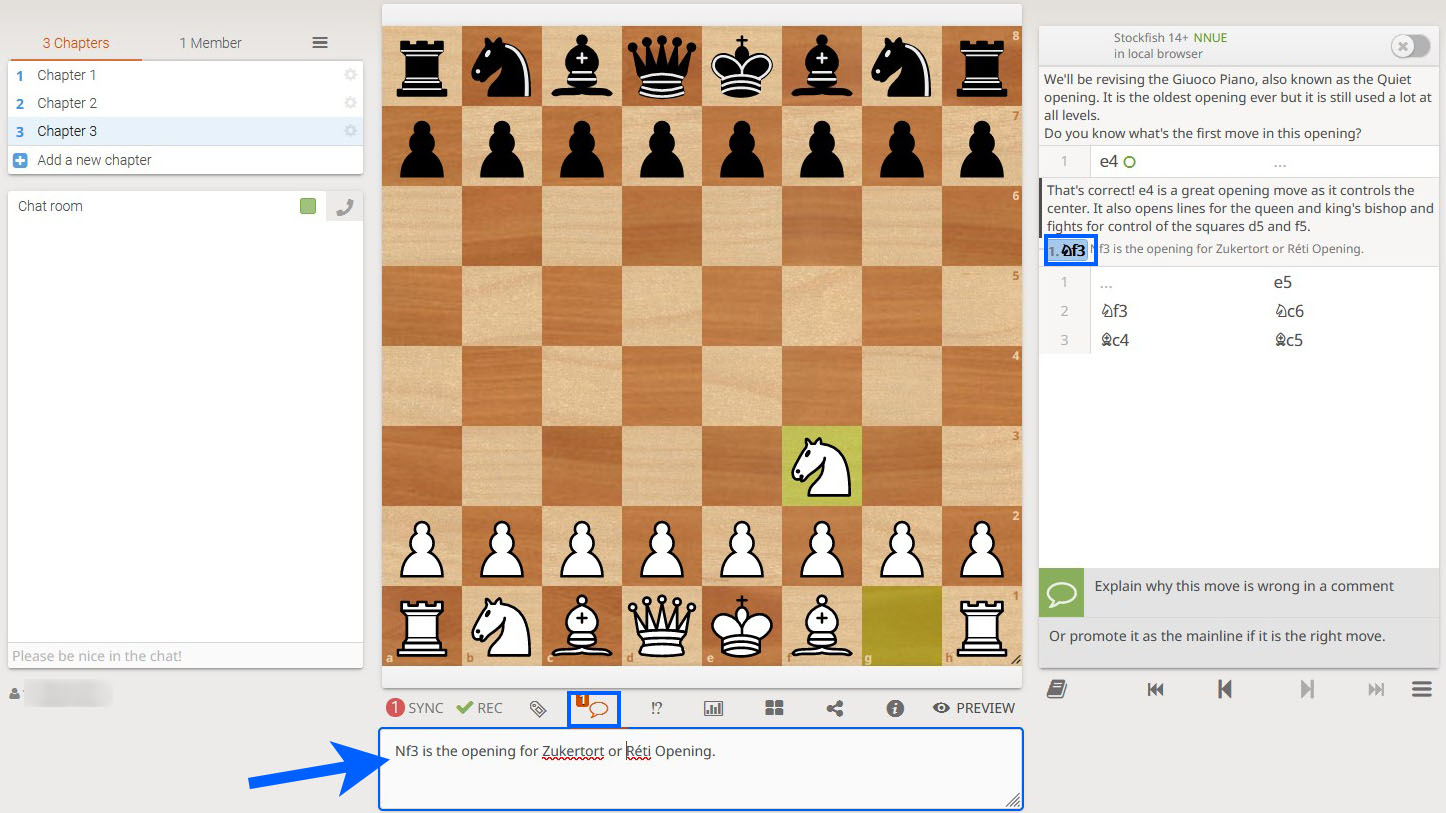
Then we’ll play the variation, i.e., the wrong move called Nf3, and then navigate to the chatbox under the board to comment on why Nf3 is not the right move.
Ensure that you haven’t played any move on the board if it’s the first move you want to comment on. But if it is, say the third White move you wish to remark, then go to the second Black move and create a variation.
Note:
You can right-click on the notation of the move to erase it or promote it to the mainline.
Step 7: Add glyphs
Glyphs are nothing but symbols that assess a move.
Go to the move you want to add glyphs and then search for an “!?” icon under the board. Simply click on a symbol, and it will be added beside the move notation.
You have now created one chapter of your opening repertoire with Lichess interactive lesson.
Unfortunately, with Lichess interactive lessons, you can’t add variations in a single chapter. This is because the “variation” moves are essentially wrong mainline moves.
You’ll need to create a single chapter dedicated to each variation. So that’s why it’s advisable to make a new study for each opening.
Lichess Interactive Lesson: What’s next?
Now that you have created a puzzle and an opening repertoire with Lichess interactive lesson, you can share it with friends and other chess players.
To share an Interactive Lesson with only select friends, make the visibility to “Invite only.” If you want to share it with friends but don’t want to add each one individually, then change the visibility to “Unlisted.” Only the ones with the URL will be able to participate in the study.
Want to make it trending? Then make sure the study is open to the public. You can share the study on social media and chess groups. The only place you can’t share is the Lichess forum, which goes against forum etiquette.

![Lichess Opening Explorer [Detailed Guide]](https://www.theschoolofrook.com/wp-content/uploads/2022/01/Lichess-Opening-Explorer-by-The-School-Of-Rook-1.jpg)