Lichess Study is the ultimate chess learning and coaching tool.
You can learn openings, tips and tricks, endgames, and more.
If you’re a coach, you can create and share lessons using the interactive analysis mode.
Lichess Study also has Opening Explorer, which has a database of 2 million+ games. So you can discover games played in OTB tournaments by the top players in the world.
The best part is everything is free and available to anyone with an internet connection.
Want to know how to use this revolutionary tool to analyze games and build lesson plans?
Let’s dive in right away and learn how to use Lichess Study!
What is Lichess Study?
Lichess Study is a free tool for learning and teaching chess.
You can create your own lessons or study ones created by others.
It has a bunch of useful features like game analysis and annotation, opening study, and puzzle organization.
Lichess Study is an all-in-one tool for creating and sharing chess content. To use Lichess Study, go to “Learn” > “Study” on Lichess.
How to navigate Lichess Study
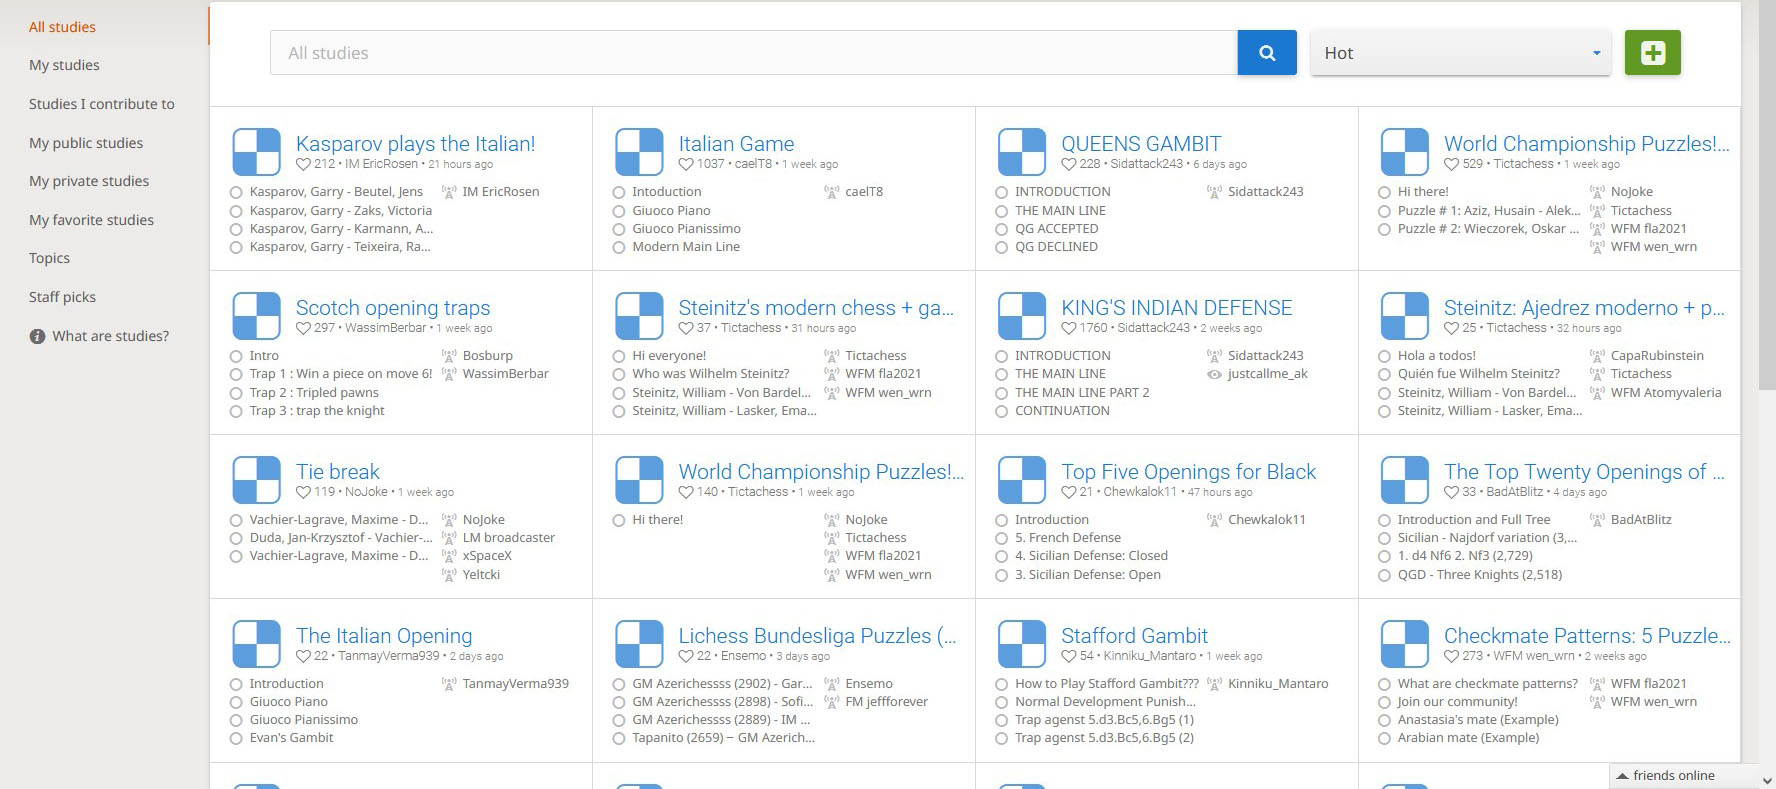
Navigating Lichess Study is relatively easy, thanks to its minimalist user interface. Upon entering Lichess Study, you’ll see the menu on your left-hand side consisting of the following parts:
- All studies: You’ll see all the “hot,” i.e., trending studies available publicly. You can change the filter to the most popular or recently created studies.
- My studies: All the studies you create and contribute.
- Studies I contribute to: All the studies you contribute to in any way.
- My public studies: Studies created by you which are visible to the public.
- My private studies: Studies created by you that are private and not open to the public.
- My favorite studies: Studies you like. To “like” a study, go to the bottom of the study and click on the heart icon. Then the study will automatically be added to your “My favorite studies.”
- Topics: These are topic categories. Besides the available categories, you can also create your own in the box and then save it.
- Staff picks: This is the best studies list on Lichess selected by the Lichess team.
- What are studies?: Information on Lichess Study.
There’s also a huge search box between the Menu and the green “create study” icon. You can search for a study by its name or author.
Now that you know how to find your way around the Lichess Study, let’s understand how to create a Lichess Study.
How to create a Lichess Study
To create a Lichess Study, click the green plus icon which says “create study” on hover. Then, you’ll land on a study page where you are asked to select these parameters:
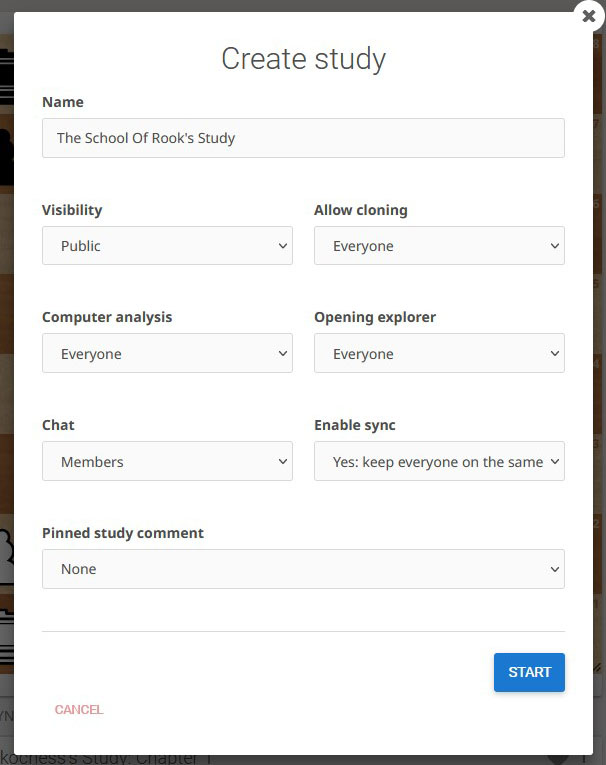
- Name: Enter the name of your study here. You can change the study name later.
- Visibility: You have three options here to determine how public or private you want the study to be:
- Public: The study will be visible to everyone.
- Unlisted: Anybody who has a link to the study can access it.
- Invite only: Only those listed as members by you can access the study.
- Allow cloning: This feature lets one duplicate the whole study. You have 5 options here to decide who to allow cloning your study: nobody, only you, contributors, members, and everyone.
- Computer analysis: Similar to “Allow cloning,” you can restrict who can use Computer Analysis. For example, if you’re making a study of puzzles, you wouldn’t want anyone to access computer analysis. Otherwise, it defeats the purpose of solving puzzles.
- Opening explorer: It’s a powerful tool with an opening and game database of super GMs, Lichess players, and yours. If you’re creating a study of openings, it’s best to limit access to yourself or contributors.
- Chat: There’s a section dedicated to message chat and voice chat. You can choose to restrict it or leave it open so that spectators can ask questions there.
- Enable sync: You have two options here: keeping everyone in the same position or letting people browse freely. Let’s say you’re using a study to coach a handful of chess players and Skype or Zoom to communicate with them.
It makes sense to go for the “Yes: keep everyone on the same position” option in this case. You can control the board, and all the members can see what you’re explaining in a position.
- Pinned study comment: You have two options here: none or right under the board. If you choose “right under the board,” the comment will be sticky, i.e., remain under the board for all the chapters. This is unlike other comments that change through chapters.
Go through all parameters again and click “Save” to create a study on Lichess. Once a study is created, you can change all the properties again.
Now let’s learn components of a Lichess Study and what they are used for.
Components of Lichess Study
Before learning how to add a chapter, we’ll check the components of Lichess Study so that you don’t find it intimidating when you start using them.
Let’s breakdown the Lichess Study features as per their location so it’ll be easy for you to navigate through them:
Left side of the chessboard
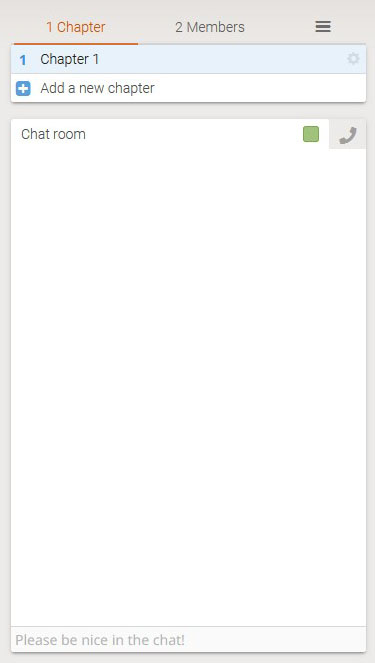
You’ll see the following three features on the top left-hand side:
- 1 Chapter: You can add chapters through this section. You can edit an existing chapter by clicking on the cogwheel icon beside the chapter’s name.
- 1 Member: This feature lets you add members to the study. Click on the plus icon below your username and type in the username of the Lichess player you want to add.
Once you add a member, you’ll see their name below yours. Click the “Contributor” toggle to add them as a contributor.
You can also remove a member from the study by selecting the Kick button. You and the contributors will have a user icon. The members will have an eye icon as they can’t edit the study.
- Hamburger icon: This lets you edit the study details such as name, visibility, and chat options. You can also clear chat and delete the study from here.
Right side of the chessboard
The large section on the right side is blank as we haven’t added any chapter in the study. Once you add a chapter, you’ll see chess notation and annotations of the game over there.
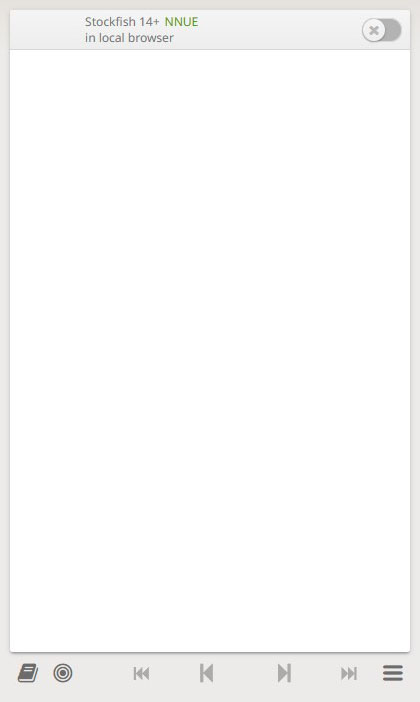
On the top right hand side, there’s a disabled toggle. It’s the local evaluation bot that provides an analysis at a local level. It isn’t as powerful as the server analysis.
After enabling the toggle, you’ll see two icons:
- Plus icon: It goes deeper than the analysis provided by the local evaluation bot.
- Bullseye icon: It shows threats on the board.
On the bottom right-hand side, there are these icons:

- Book icon: This is called the Opening Explorer and Tablebase. As mentioned above, it has a game database of masters (top players), lichess players and yours. To know more, you can follow our detailed post on how to use Opening Explorer.
- Target icon: The engine suggests the best move. You have the “get a hint” option where the engine circles the piece it thinks you should move. And if you choose “see the move,” it will point to the square you should move the piece.
- Direction symbols: There are four direction symbols: the first move, next move, back move, and the last move of the game, respectively.
- Hamburger icon: This is the Menu where you’ll see more features like “Board Editor” and “Inline notation.”
Let’s take a deeper dive into the Menu so that you don’t miss out on these features:
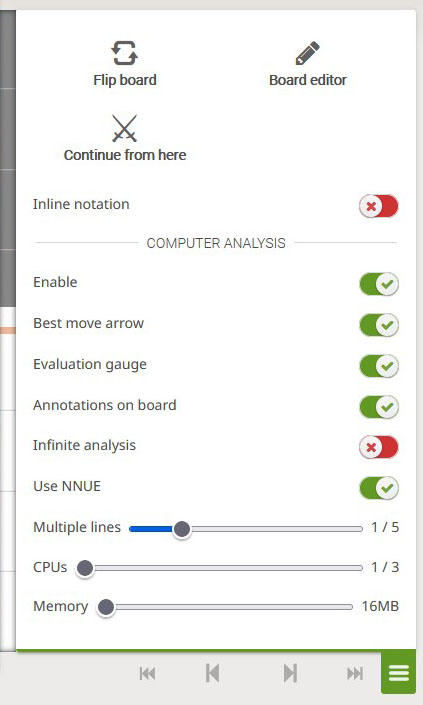
- Flip board: This feature flips the board so that you can analyze the game from the other side.
- Board Editor: This feature exports the exact position to the Board Editor. You can then edit the position there to create a puzzle.
- Continue from here: This unique feature lets you export the position to a game where you can continue playing the position with a friend or the computer. You can up the ante by changing the chess variant and time control.
- Inline notation: This feature changes the chess notation to paragraph form from line form.
- Enable: This Stockfish engine analysis is enabled by default unless you have restricted the Computer Analysis to Nobody.
- Best arrow move: It shows the best move as per local engine analysis.
- Evaluation gauge: It’s the bar located on the right side of the chessboard. It evaluates centipawn loss per move.
- Annotations on board: These are comments and glyphs (symbols) of all the moves. If you switch off the toggle, the members won’t see the annotations.
- Infinite analysis: This feature analyzes the game endlessly. So that’s that it’s disabled by default as it takes up an incredible amount of resources to run.
- Use NNUE: NNUE stands for neural network architecture. It’s the latest technology in chess programming.
- Replay mode: It can replay the game at a fast or slow speed.
Bottom of the chessboard
Below the chessboard and the bottom of the screen are these tabs:
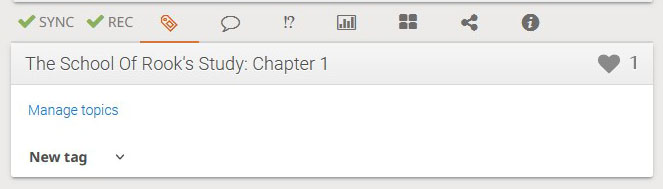
- SYNC: You’ll see this option if you’ve selected “Yes: keep everyone on the same position” while creating the study.
- REC: Rec stands for the record. Any changes you make in the study will automatically be saved. It is enabled by default; that’s why you’ll see a green tick beside it.
- PGN Tags (Tag icon): It has all the game details you’ve imported in the study. Note that you can edit all the details here. If it’s a position you’ve created, it will have no details.
- Comment on this position (Chat icon): You can add comments on each move here.
- Annotate with glyphs (Exclamation mark and question mark): There are 24 symbols that provide an assessment of the position. You can select any sign, and it will automatically appear beside the notation.
- Computer analysis (Graph icon): You can request the server engine for analysis. Once analyzed, you’ll see a graph that shows centipawn loss per move in the opening, middle game, and endgame.
On the bottom right side, you’ll see inaccuracies, mistakes, and blunders committed by both players. The engine will take you to the move if you click on any of these analytical points.
- Multiboard (4 Squares icon): This shows the end position of all the chapters. You can click on the board to navigate to the specific chapter.
- Share & export (Share icon): This lets you share the study and chapter by offering options such as downloading PGN and GIF, embedding in your website, and copying FEN.
- Need help? (Information icon): This option gives you a tour of Lichess Study.
Now let’s learn how to add content in the form of chapters in a Lichess Study.
How to add a chapter in Lichess Study
Depending on the parameters you have selected to create a Lichess Study, you’ll see or not see opening explorer, chat, and computer analysis.
To add a chapter in a Lichess Study, go to the top left side, click “1 Chapter,” and then “Add a new chapter.” You’ll see the following options:
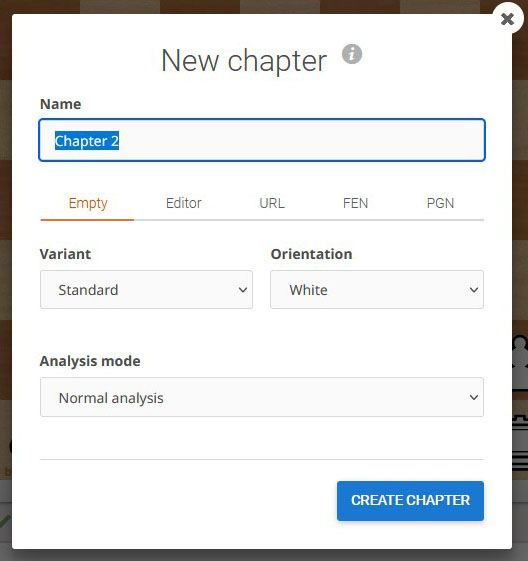
- Empty: You can start from the initial chess position. It works best for adding openings in the study.
- Editor: Over here, you can set a custom position. You can use this feature for creating puzzles when you don’t have FEN of the position.
You can also edit the board for endgame puzzles. You can select if it’s black or white’s turn to play and if castling is allowed for both the colors in the position. - URL: You can simply load games from lichess.org or chessgames.com by pasting the link in the box. You can create multiple chapters by adding various games.
Note:
Each URL should be on a separate line.
- FEN: Paste Forsyth-Edwards Notation (FEN) of a position to make a chapter on puzzles, tactics, or strategy. It’s convenient and saves time instead of editing the board manually by using the Editor option.
- PGN: Paste Portable Game Notation (PGN) of a game to analyze your or anyone’s game. You can use the URL option to import games from Lichess or Chessgames.com.
But for other games, download their PGN and upload it here. And the best part is you can paste up to 32 games in one go.
To sum up the above 一
- Use Empty for openings.
- Use Editor or FEN for custom positions.
- Use URL to load games from Lichess or Chessgames.com
- Use PGN to import a game from other websites like Chess.com.
Next, you need to select Variant, Orientation, and Analysis mode.
The Variant will be “Standard” if you create a study in the regular standard format. The Orientation is the color of your pieces.
There are four Analysis Modes in a Lichess Study:
- Normal analysis: This is the default mode which works like a regular chess engine analysis. It’s generally used to analyze games.
- Practice with computer: This mode lets you play with the chess engine. You can use Editor or FEN to add a chess position and then continue playing against the computer engine. It can be used for chess puzzles, opening training, and endgame training.
- Hide next moves: This mode hides the next move from the members or spectators of the study. Chess coaches can use this mode to play “guess the move” while analyzing games or tactics.
- Interactive lesson: This special mode requires the player’s active participation. The player receives clues, instructions, and feedback if they are right or wrong as they go through the study.
It can be used for openings, tactics, games, and puzzles. Here’s an example of an interactive lesson on Lichess about Ruy Lopez Traps.
If you select interactive mode, you’ll need to add information on every step to help the players. You can check out our latest article on how to create Lichess Interactive lessons for more details.
That’s it! Congrats, you’ve created a Lichess Study all by yourself. You can now annotate games, add glyphs, and ask for a server analysis by using the tabs below the chessboard.
You can also use the Opening Explorer to learn openings and practice them with the engine to know how an opening can play out in real games.
Once your study is ready, you can share it with friends by adding them as members. If it’s a public study, you can share its URL in chess communities.
Keyboard shortcuts for Lichess Study
| Feature | Keyboard Shortcut |
| Flip board | f |
| Opening explorer | e |
| Show threat | x |
| Toggle local evaluation | l |
| Toggle all computer analysis | z |
| Best arrow move | a |
| → key (Next move) | j |
| ← key (Back move) | k |
| First move | ↑ or 0 |
| Last move | ↓ or $ |
| Disable computer analysis | z |
| Computer arrow (turn on/off) | A |
| (Play) Best move | Space bar |
| Search box | s |
| Write comment | d |
| Add glyphs | g |
| Next chapter | n |
| Previous chapter | p |
| Green circle | Right-click |
| Green arrow | Right-click + drag |
| Red circle | Shift key + Right-click |
| Red arrow | Shift key + Right-click + drag |
| Orange circle | Shift key + Alt key + Right-click |
| Orange arrow | Shift key + Alt key + Right-click + drag |
| Blue circle | Alt key + Right-click |
| Blue arrow | Alt key + Right-click + drag |
| Show keyboard shortcuts | ? |
Additional information to use Lichess Study efficiently
- You can create a maximum of 32 chapters in a study.
- Lichess has green, red, orange, and blue color arrows and circles that you can use to direct the spectators or players.
- Use the “?” key to check the keyboard shortcuts for Lichess Study.
- Lichess Study supports all variants.
- You can also use “multiboard” located below the chessboard to switch between chapters.
- You can embed a study, chapter, or game analysis on your website. The only prerequisite is that the Lichess Study must be public and not private.
Top Lichess Studies
- Opening traps by Toxenory.
- Stafford Gambit traps by IM Eric Rosen.
- Caro-Kann Defense Repertoire by NM Mr_Penings.
- Test Your Opening Knowledge – Typical Positions by GM Petar Arnaudov.
- Beating the London System by IM TatoSarane.
What’s after learning how to use Lichess Analysis Board
Lichess Study is a comprehensive tool with many useful features you can use to analyze games, coach chess players, and create content for your website.
It can get quite intimidating to use because of the sheer number of features. So I hope this detailed guide on Lichess Study helps you create and share valuable chess material with fellow chess players.
And if you feel lost while using this tool, you can always come back to this article to understand the features.